Ideem FIDO2 Authenticator
Confidential - All materials are intended to be used for informational purposes only and are the sole intellectual property of Ideem, Inc.
For questions and feedback, contact support@useideem.com.
Introduction
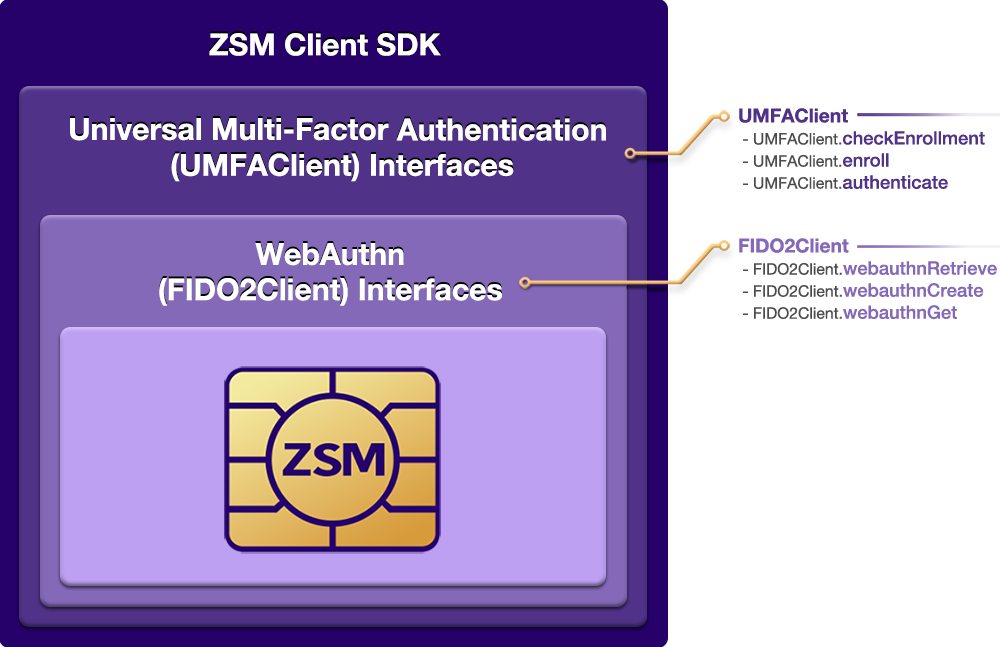
Ideem provides this client software development kit (ZSM Client SDK) for your use in integrating FIDO2 Authenticator into your application.
Here is a high level view of the interfaces exposed by the ZSM Client SDK:
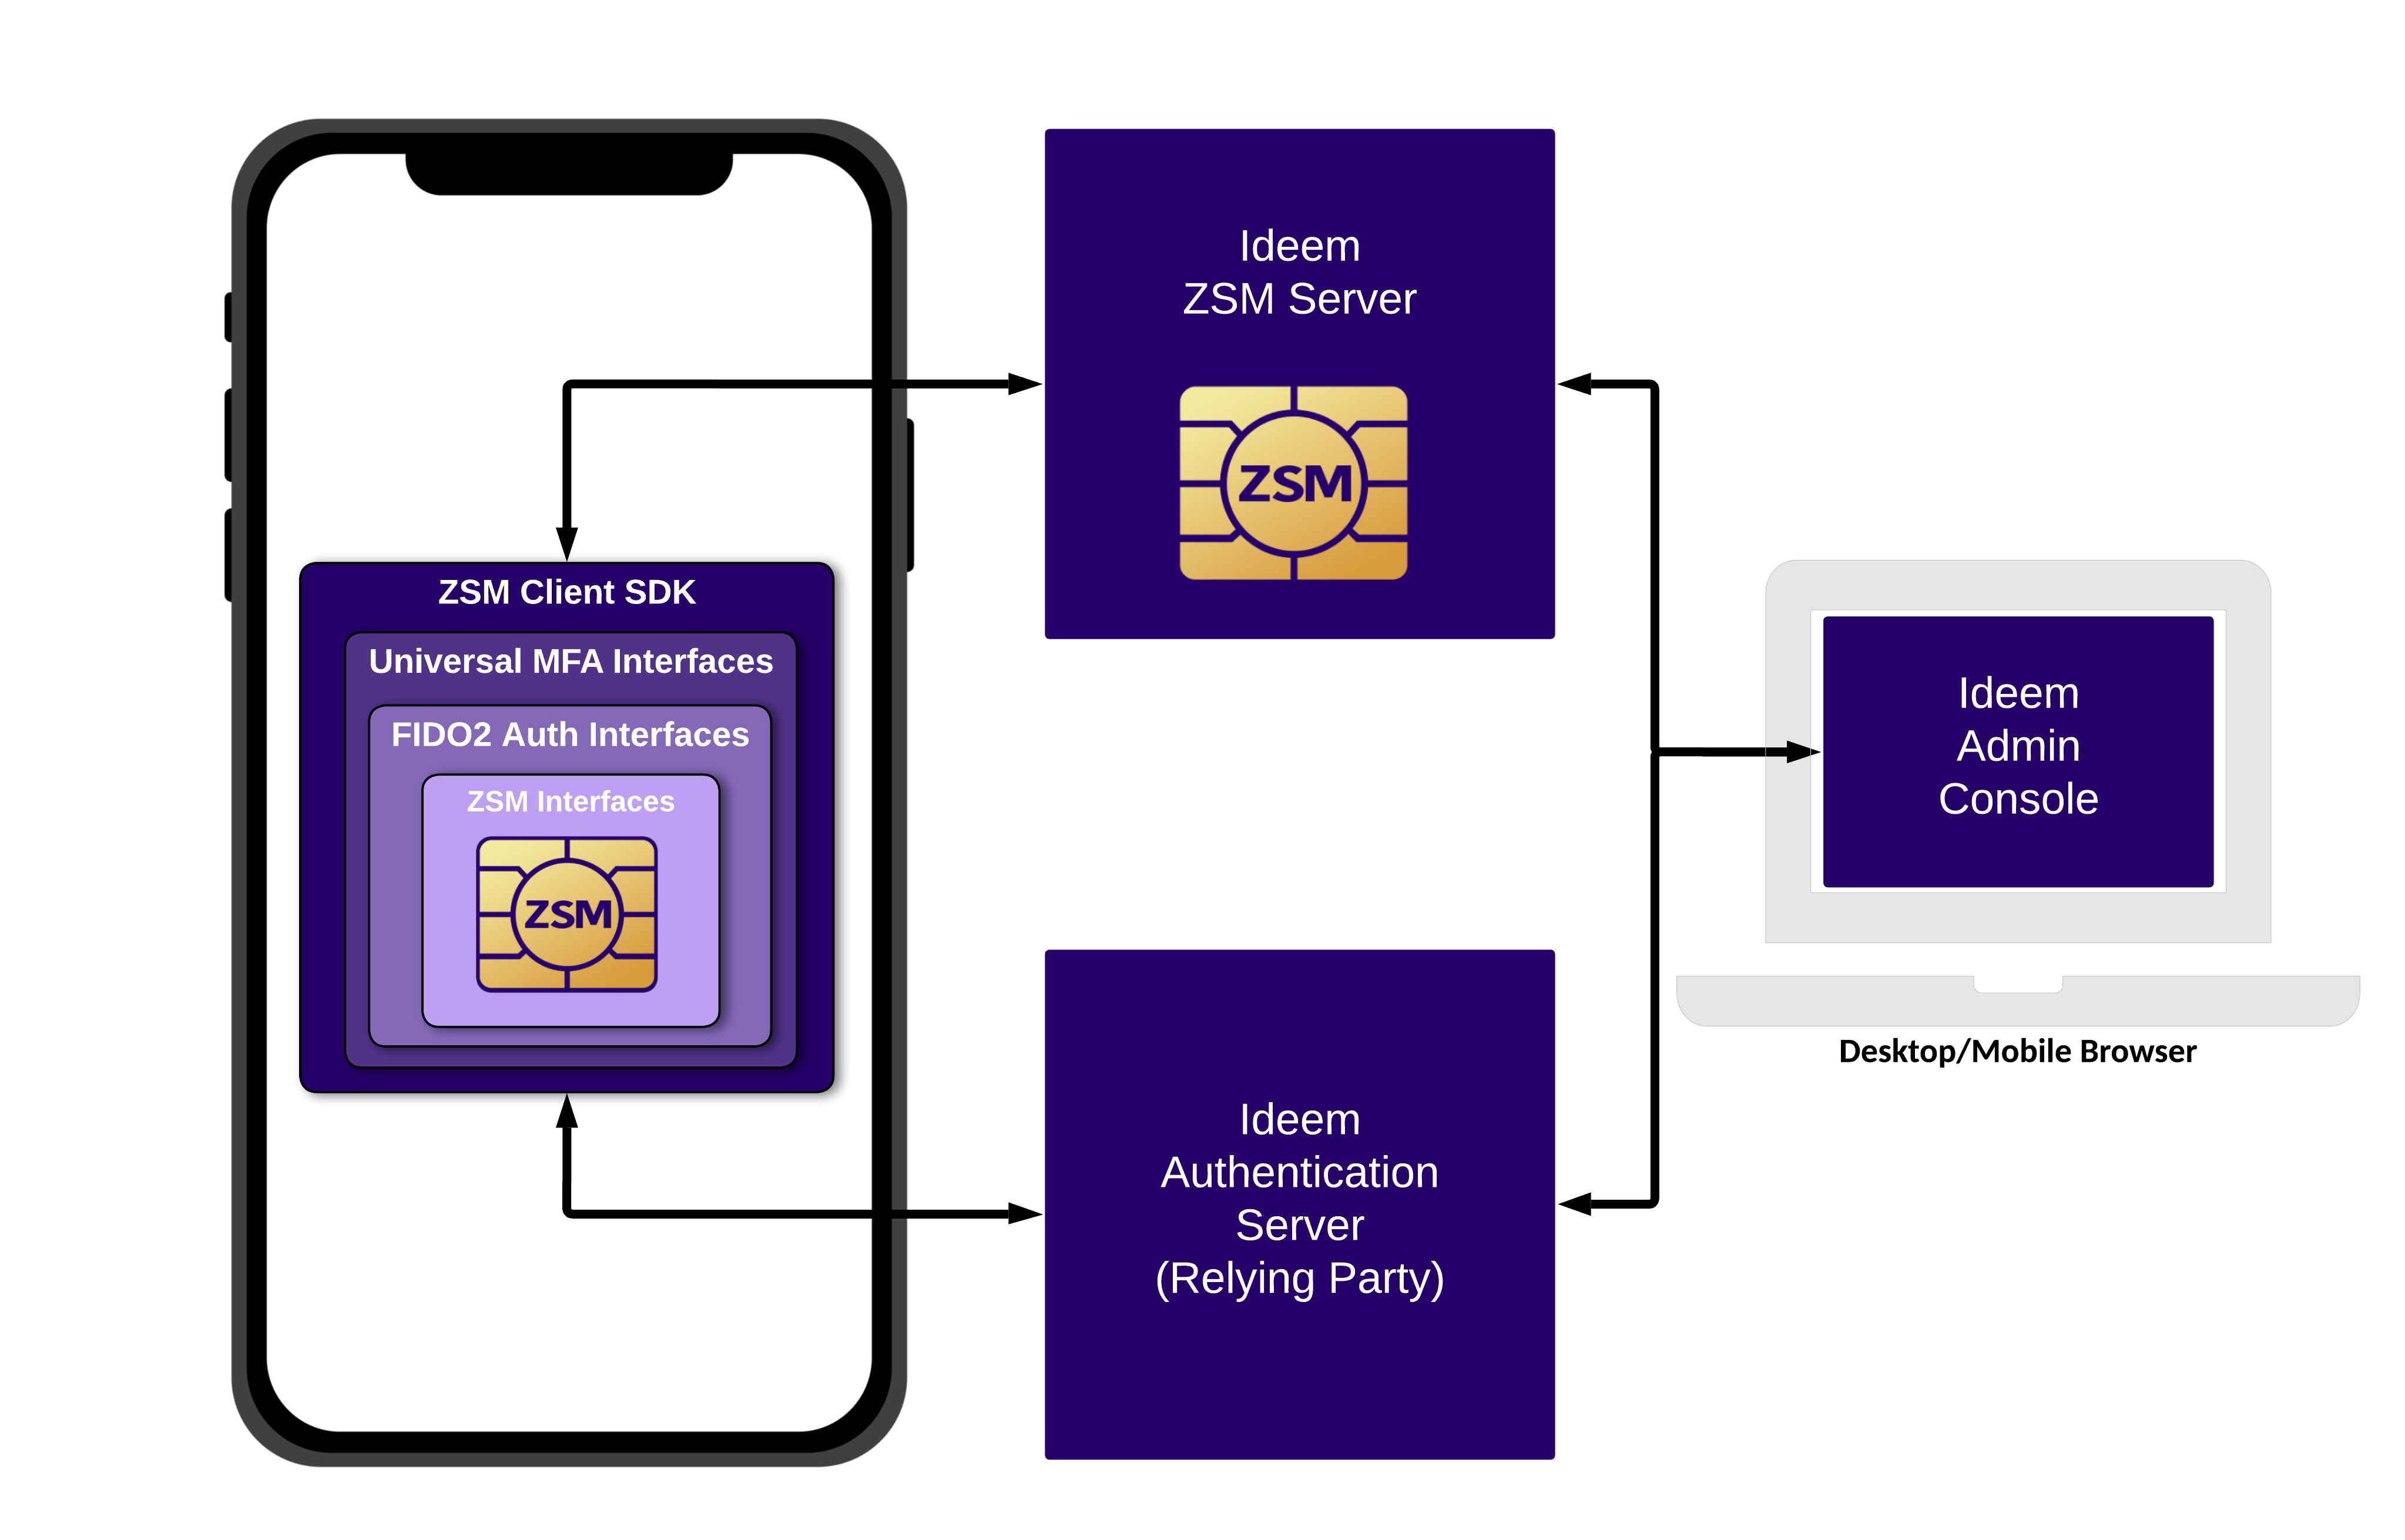
The Ideem System
The ZSM Client SDK works along with other Ideem system components to perform the available operations. Those components are:
- ZSM Crypto Module: The ZSM Crypto Module provides the underlying MPC-based cryptography at the core of Ideem’s ZSM and is FIPS 140-3 validated.
- ZSM Client SDK: The Client SDK contains the ZSM Crypto Module and provides programmatic access to Ideem’s interfaces for FIDO2 Authentication.
- ZSM Server: The Cryptographic Server contains the ZSM Crypto Module and participates with the Client SDK in all MPC-based operations.
- Authentication Server: The Authentication Server is responsible for managing consumer profiles, integrating with authentication services, and providing WebAuthn relying party capabilities.
- Admin Console: The Admin Console provides our customers application management, consumer management, usage monitoring, and troubleshooting capabilities.
Here is a high level view of how these system components work together:
ZSM Client SDK Overview
This document covers the installation and use of the ZSM Client SDK. The ZSM Client SDK offers interfaces into Ideem's cryptographic authentication services for implementing FIDO2 Authenticator into your appliction.
FIDO2 Authentication
If you have an existing relying party infrastructure in place, you can use Ideem's FIDO Authenticator interfaces to perform Attestation (WebAuthn Create) and Assertion (WebAuthn Get) operations.
The FIDO2Client class exposes these interfaces:
webauthnRetrieve()
webauthnRetrieve() is used to determine if an end user is already enrolled. If they are enrolled, their ZSM credentials are returned.
webauthnCreate()
webauthnCreate() is used to enroll the consumer, which generates their ZSM credentials. After successful enrollment, the credential ID and Public Key associated with it are returned. This data can then be stored in association with the consumer ID, and used for future webauthnGet() verification operations.
webauthnGet()
webauthnGet() is used to verify the consumer against their existing ZSM credential set. During webauthnGet() processing, a challenge from a relying party server is signed using ZSM MPC. The signed challenge can then be verified using the Public Key stored following the webauthnCreate() operation.
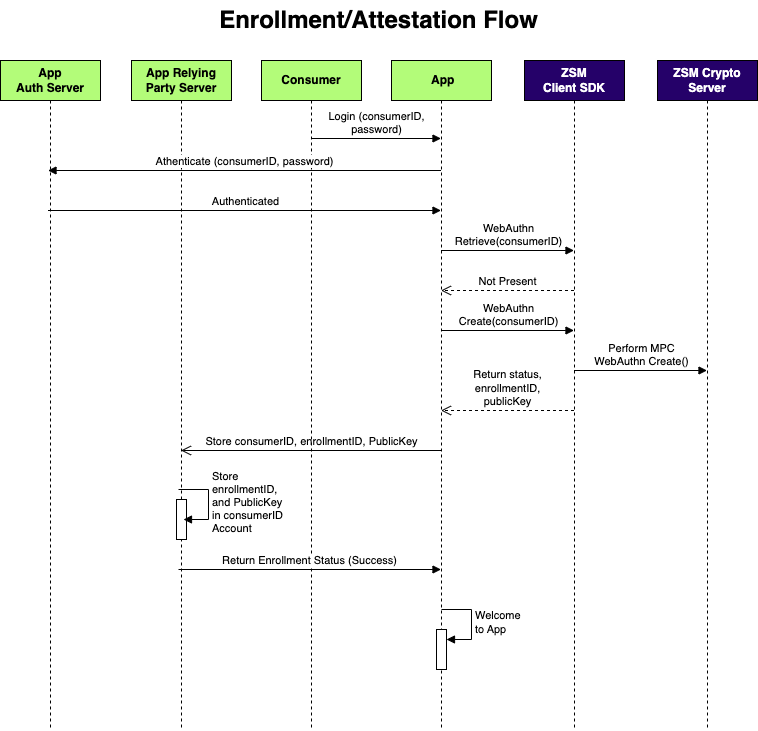
FIDO2 Authentication Sequence Diagrams
Example Enrollment Flow
After performing strong authentication for a consumer, you cryptographically bind them to their device using webauthnCreate().
Example Verification Flow
On subsequent logins, you perform a silent 2FA for the consumer, using the webauthnGet().
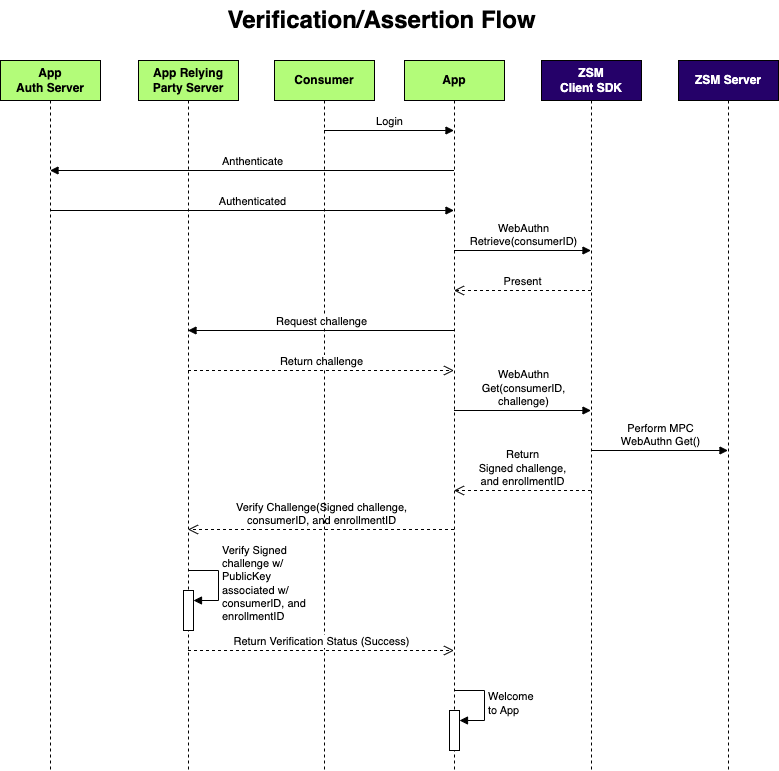
Example Step Up Verification Flow
When the consumer initiates a transaction requiring re-verification, e.g., a large money transfer, you can perform a silent verification using webauthnGet() before allowing the transaction.

API Versioning and Backward Compatibility
Ideem uses semantic versioning of its APIs. Semantic versioning is an industry standard approach around how API versions are named. It defines a version number in the format of X.Y.Z where X, Y, and Z are the major, minor, and patch versions.
In practicality, Semantic Versioning is implemented on a spectrum of strictness. We take a flexible approach in the following way:
- We only increase the major version for changes of a significant breaking nature. If this version number changes, significant changes must be made by all users of our API.
- We may increase the minor version for minor breaking changes instead of increasing the major version. We would only take such action when that change has a very limited scope and the impact has been discussed and agreed upon by the impacted parties. A concrete example of this is if we change a special feature used by one or two of our customers in a breaking way in conjunction with agreement from these impacted customers. But the change otherwise does not impact our overall customer base.
- In a strict interpretation, the patch version would only be increased for bug fixes. We may increase our patch version for minor new features or enhancements to existing features so long as these changes do not represent a breaking change.
Ideem will support the current and one prior major version of each API for a 24-month period, including all minor, and patch updates to those major versions.
Let's Get Started
In the following pages, you will learn how to:
- Add the ZSM Client SDK to your application project
- Use the interfaces for FIDO2 Authentication and Universal Multi-Factor Authentication (UMFA).
Working with Browser Applications
This section will focus on integration of the ZSM Client SDK into browser-based applications.
Languages Supported
- JavaScript
- TypeScript
Supported Web Frameworks
- React: 16.8 and later
- VueJS: 2.5.4 and later
- Angular: 6 and later
- Svelte: 3 and later
Supported Browsers
- Google Chrome: 57 and later
- Mozilla Firefox: 52 and later
- Safari: 11 and later
- Microsoft Edge: 16 and later
- Opera: 44 and later
Example Browser Project Files
Example implementations are included in the ZSM Client SDK in the folder examples.
Installation & Setup for Browser Applications
Adding the ZSM Client SDK into your Browser project
The ZSM Client SDK is a package that provides programmatic access to Ideem’s interfaces used to integrate FIDO2 Authentication into your application. This document will guide you through the process of adding the ZSM Client SDK to your Browser app project.
Step #1: Install the NPM Package
From within your project directory, run the following command to install the ZSM Client SDK:
npm install @ideem/zsm-client-sdk --save
After installation, you should see the following in your package.json file (#.#.## will depend on the version installed):
"dependencies": {
    "@ideem/zsm-client-sdk": "^#.#.##"
}
IMPORTANT: You can ensure that, during the development process, the ZSM Client SDK is always up to date by using the npm update command.
OPTIONAL: You can also change the "^#.#.##" in your package.json to "latest" to always get the latest version (although it is recommended that you specify a specific version, or version range when rolling to production to avoid breaking changes as future releases are published):
"dependencies": {
    "@ideem/zsm-client-sdk": "latest"
}
Step #2: Import the ZSM Client SDK
The ZSM Client SDK can be imported into your application in one of three ways:
1. ES Modules/Frameworks/Modern Universal ("import" syntax)
The SDK can be included in ES module applications using the import statement.
(This includes virtually all modern browsers and Node.js versions that support ES modules; which includes almost every JS framework).
(This also includes the use of the type="module" attribute in the <script> tag, as well as the use of the --experimental-modules flag in Node.js.)
Frameworks (and Node.js with ES modules/--experimental-modules flag)
import { FIDO2Client } from './zsm-client-sdk.js';
(or, using the type="module" attribute in the <script> tag of vanilla HTML)
<script type="module">
    import { FIDO2Client } from "./node_modules/@ideem/zsm-client-sdk/zsm-client-sdk.js";
</script>
2. Node.js/CommonJS ("require" syntax):
The SDK can be included in Node.js and CommonJS applications using the require function.
const { FIDO2Client } = require('./zsm-client-sdk.js');
3. Browser/HTML:
The SDK can be included in HTML files using a <script> tag. The SDK will be available as a global object named ZSMClientSDK.
<script src="./node_modules/@ideem/zsm-client-sdk/zsm-client-sdk.js">
    const {FIDO2Client} = ZSMClientSDK;
</script>
Step #3: Set up the ZSM Configuration File
Within your application, create a .json file or JSON object to store the ZSM application configuration. It should contain the following properties:
{
    "application_id"           : "XXXXXXXX-XXXX-XXXX-XXXX-XXXXXXXXXXXX",
    "host_url"                 : "https://zsm-authenticator-demo.useideem.com/",
    "application_environment"  : "TEST",
    "api_key"                  : "XXXXXXXX-XXXX-XXXX-XXXX-XXXXXXXXXXXX"
}
These values are provided by Ideem and are unique to your application, although testing versions are pre-populated in the Sample Apps specific to the language you are using.
Configuration Properties
| Property Name | Data Typ | Description | Default Value |
|---|---|---|---|
application_id | string | The application ID to be used during the U2FA process | provided by Ideem; test value available in sample config |
host_url | Boolean | The URL to your region-specific ZSM server | provided by Ideem; demo server specified in sample config |
api_key | string | The API key to be used during the U2FA process | provided by Ideem; test value available in sample config |
application_environment | string | The application environment to be used during the U2FA process | TEST |
Step #4: Initialize the ZSM Client SDK
After importing the ZSM Client SDK and setting up the configuration file, you can initialize the client SDK - being sure to pass it the configuration object you created in the previous step - as follows:
FIDO2 Client:
const fido2Client = new FIDO2Client(config);
FIDO2 APIs for Browser Applications
Ideem's FIDO2 Authenticator interfaces enable seamless integration with an existing Relying Party (RP) infrastructure. The Relying Party is a critical component in the WebAuthn framework, typically representing the server that interacts with users’ authenticators to handle the registration and authentication processes. The Relying Party is responsible for securely storing users' credential IDs, public keys, and managing authentication challenges.
Through these interfaces, you can determine whether a user has already been enrolled (i.e., their device has been cryptographically bound to an account). The interfaces provide the ability to either create an enrollment if none exists or verify an existing enrollment. FIDO2 WebAuthn functions also support re-authentication for scenarios that require step-up authentication, such as sensitive transactions or multi-factor authentication.
The following sections describe the core API methods used to interact with WebAuthn, detailing how to retrieve enrollment status, create new credentials, and verify users.
Relying Party Overview
A Relying Party (RP) is a system or service that requests the user's authentication via WebAuthn. In the FIDO2/WebAuthn architecture, the RP plays the crucial role of initiating the registration and authentication process, sending appropriate challenges to the user’s authenticator, and verifying the signed responses.
When a user registers with a Relying Party, the RP generates a challenge and sends it to the authenticator. Upon successful registration, the RP stores the credential ID and the associated public key for future verification of the user's identity. Similarly, during the authentication process, the RP sends another challenge, which the user’s authenticator signs and returns. The RP then verifies the signature using the public key associated with the credential ID.
Ideem's interfaces abstract much of this complexity, allowing developers to focus on integrating FIDO2 authentication into their applications by simply interacting with the webauthnCreate, webauthnRetrieve, and webauthnGet methods.
Interface Definitions
Note that the following interface definitions presuppose that you have already imported the FIDO2Client class from the ZSM Client SDK (@ideem/zsm-client-sdk). If you have not yet done so, please refer to the Web Framework Setup documentation for instructions on how to import the ZSM Client SDK.
Webauthn Retrieve FIDO2Client.webauthnRetrieve() (Check For Existing Credentials)
The webauthnRetrieve method of the FIDO2Client class retrieves the attestation data generated during the WebAuthn creation process. This method allows the Relying Party to check if a user has previously been enrolled, meaning that their device has a stored credential ID linked to their account.
Parameters
| Parameter Name | Data Type | Description |
|---|---|---|
userIdentifier | String | The unique identifier for the user. This is typically the user's email address or a UUID. |
Returns
| Parameter Name | Data Type | Description |
|---|---|---|
response | PublicKeyCredential | The retrieved WebAuthn credential containing attestation data*. |
The attestation data returned contains cryptographic information needed to verify the user’s identity and ensure that the credential is securely bound to the device.
Usage
JavaScript
FIDO2Client.webauthnRetrieve()
.then(response => {
    console.log("Retrieved attestation data", response);
    // Process attestation data
})
.catch(error => {
    console.error("Error retrieving attestation data:", error);
});
TypeScript
FIDO2Client.webauthnRetrieve()
    .then((response:PublicKeyCredential) => {
        console.log("Retrieved attestation data", response);
        // Process attestation data
    })
    .catch((error: any) => {
        console.error("Error retrieving attestation data:", error);
    });
Webauthn Create FIDO2Client.webauthnCreate() (Create New Credential/Enroll)
The webauthnCreate method initiates the creation of a new WebAuthn credential by leveraging the PublicKeyCredentialCreationOptions. This method is used during user registration to create a public-private key pair, which is cryptographically bound to the user and device.
Once the credential is created, the Relying Party securely stores the credential ID and public key for future authentication. The client-side device will keep the private key securely stored within the authenticator.
The process follows the FIDO2 standard, ensuring that the public-private key pair is securely created and attested.
Parameters
| Parameter Name | Data Type | Description |
|---|---|---|
create_options | PublicKeyCredentialCreationOptions | A JSON object representing the creation options for WebAuthn credentials. |
Returns
| Parameter Name | Data Type | Description |
|---|---|---|
credential | PublicKeyCredential | The created WebAuthn credential object. |
Usage
JavaScript
const publicKeyOptions = {
    challenge: new Uint8Array([117, 61, 252, 231, 191, 241, ...]),
    rp: { id: "acme.com", name: "ACME Corporation" },
    user: {
        id: new Uint8Array([79, 252, 83, 72, 214, 7, 89, 26]),
        name: "jamiedoe",
        displayName: "Jamie Doe"
    },
    pubKeyCredParams: [{ type: "public-key", alg: -7 }]
};

FIDO2Client.webauthnCreate(publicKeyOptions)
    .then(credential => {
        console.log("Credential created successfully", credential);
        // Handle successful creation, access credential response
    })
    .catch(error => {
        console.error("Error creating credential:", error);
    });
TypeScript
const publicKeyOptions:PublicKeyCredentialCreationOptions = {
  challenge: new Uint8Array([117, 61, 252, 231, 191, 241, ...]),
  rp: { id: "acme.com", name: "ACME Corporation" },
  user: {
    id: new Uint8Array([79, 252, 83, 72, 214, 7, 89, 26]),
    name: "jamiedoe",
    displayName: "Jamie Doe"
  },
  pubKeyCredParams: [{ type: "public-key", alg: -7 }]
};

FIDO2Client.webauthnCreate(publicKeyOptions)
    .then((credential:PublicKeyCredential) => {
        const response = credential.response as AuthenticatorAttestationResponse;

        // Access attestationObject ArrayBuffer
        const attestationObj:ArrayBuffer = response.attestationObject;

        // Access client JSON
        const clientJSON:PublicKeyCredential = response.clientDataJSON;

        console.log("Credential created successfully", credential);
    })
    .catch((error: any) => {
        console.error("Error creating credential:", error);
    });
Webauthn Get FIDO2Client.webauthnGet() (Authenticate/Verify User)
The webauthnGet method retrieves a credential object based on the PublicKeyCredentialRequestOptions. This method is used to authenticate the user by having their authenticator sign the provided challenge. The signed challenge is then sent back to the Relying Party, which verifies the signature using the previously stored public key.
This method is central to the authentication process, ensuring that only the correct device and user (who possess the private key) can successfully sign the challenge and prove their identity.
Parameters
| Parameter Name | Data Type | Description |
|---|---|---|
get_options | PublicKeyCredentialRequestOptions | A JSON object representing the options for retrieving WebAuthn credentials. |
Returns
The promise resolves with the following parameters:
| Parameter Name | Data Type | Description |
|---|---|---|
assertion | PublicKeyCredential | The WebAuthn credential assertion object. |
Usage
JavaScript
const requestOptions = {
    challenge: new Uint8Array([117, 61, 252, 231, 191, 241, ...]),
    allowCredentials: [{ type: "public-key", id: new Uint8Array([79, 252, 83, 72, 214, 7, 89, 26]) }],
    userVerification: "preferred"
};

FIDO2Client.webauthnGet(requestOptions)
    .then(assertion => {
        console.log("Assertion obtained successfully", assertion);
        // Handle successful assertion
    })
    .catch(error => {
        console.error("Error obtaining assertion:", error);
    });
TypeScript
const requestOptions: PublicKeyCredentialRequestOptions = {
  challenge: new Uint8Array([117, 61, 252, 231, 191, 241, ...]),
  allowCredentials: [{ type: "public-key", id: new Uint8Array([79, 252, 83, 72, 214, 7, 89, 26]) }],
  userVerification: "preferred"
};

FIDO2Client.webauthnGet(requestOptions)
    .then((assertion: PublicKeyCredential) => {
        console.log("Assertion obtained successfully", assertion);
        // Handle successful assertion
    })
    .catch((error: any) => {
        console.error("Error obtaining assertion:", error);
    });
Unenroll FIDO2Client.webauthnDelete() (Remove user's enrolled credentials from the device)
The webauthnDelete method of the FIDO2Client class removes the specified, enrolled user's credentials from the device the user is actively logged in with. This effectively deletes any credentials associated with the user, preventing future authentication using those credentials, until the user re-enrolls on said device.
Parameters
| Parameter Name | Data Type | Description |
|---|---|---|
userIdentifier | String | The unique identifier for the user. This is typically the user's email address or a UUID. |
Returns
| Parameter Name | Data Type | Description |
|---|---|---|
response | Promise | Returns a promise containing the results of the unenrollment. This can include any one of the following: |
true (boolean) : The user's credentials were successfully removed from the device | ||
false (boolean): The user was not enrolled and/or had no valid local credential set | ||
error ( Error ): Unable to unenroll |
Usage
JavaScript
const deleteResult = await FIDO2Client.webauthnDelete(userIdentifier);
if (deleteResult instanceof Error) throw(deleteResult);                     // Error Condition
if (!deleteResult)  console.warn("User not enrolled");                      // Unenrollment Failed
if (!!deleteResult) console.log("User successfully unenrolled");            // Successful Unenrollment
TypeScript
const deleteResult:boolean|Error = await FIDO2Client.webauthnDelete(userIdentifier);
if (deleteResult instanceof Error) throw(deleteResult);                     // Error Condition
if (deleteResult === false) console.warn("User not enrolled");              // Unenrollment Failed
if (deleteResult === true)  console.log("User successfully unenrolled");    // Successful Unenrollment
Event: FIDO2ClientReady
The FIDO2ClientReady event is dispatched when the FIDO2Client is ready to be used. This event is emitted from the worker thread to the main thread's window object. This event can be listened for - to ensure that the client is fully initialized before attempting to call methods contained within it - and the listener can, upon its firing, be used to trigger any necessary actions or UI updates in your application.
Details
In some implementations, the FIDO2Client may take a short time (typically measured in tens of milliseconds, depending on client system specifications) to initialize, especially if it is being loaded from a remote source or if it is being loaded JIT (Just-In-Time) immediately preceding its use.
As such, a listener for this event can be added to the window object to ensure that the FIDO2Client is fully initialized before attempting to call methods contained within it.
Payload
| Parameter | Type | Description |
|---|---|---|
detail | Boolean (true) | The detail object inside the event will always contain the value true, indicating that the FIDO2Client is ready to be used, but since the event is only emitted once it's already ready, this is a formality and can be ignored. |
Usage
JavaScript
window.addEventListener('FIDO2ClientReady', function (event) {
    console.info("FIDO2ClientReady event received!");

    // Perform any additional actions that involve the FIDO2Client, assured that it is ready to be used
});
TypeScript
window.addEventListener('FIDO2ClientReady', function (event: CustomEvent) {
    console.info("FIDO2ClientReady event received!");

    // Perform any additional actions that involve the FIDO2Client, assured that it is ready to be used
});
Note...
The FIDO2ClientReady event is a custom event and is not part of the standard DOM events. It is specific to the FIDO2Client implementation and should be handled accordingly. In most implementations, this event listener should not be necessary, as the FIDO2Client is typically initialized during the page load and will be long-since ready prior to its use. However, in some specific cases, this event may be useful to ensure that the client is fully initialized before attempting to call methods contained within it.
Example Code
This example demonstrates the full process of using Ideem’s FIDO2 WebAuthn API for registration, authentication, and how to customize the Relying Party. The WebAuthnClient can either use the default Relying Party provided by the API or allow you to pass in a custom Relying Party if you want more control over how credential IDs, tokens, or user data are handled.
Example of Default Flow: Registration and Authentication
In this example, we use the default Relying Party provided by the API:
const client = new WebAuthnClient();

// Sign in with username and password
FIDO2Client.signIn('jamiedoe@example.com', 'password123')
.then(() => {
    console.log("Signed in successfully");

    // Start the WebAuthn registration process
    return FIDO2Client.webauthnCreate('jamiedoe@example.com');
})
.then((response) => {
    console.log("WebAuthn registration complete", response);

    // Now authenticate the user using the WebAuthn credential
    return FIDO2Client.webauthnGet('jamiedoe@example.com');
})
.then((data) => {
    console.log("WebAuthn authentication successful", data);
})
.catch((error) => {
    console.error("Error during registration/authentication", error);
});
In this flow:
- The user signs in using their email and password.
- If they don’t have a WebAuthn credential, they go through the
webauthnCreateprocess to register. - Once registered, they can authenticate using
webauthnGetin future logins.
Custom Relying Party Example
If you need more control over how credentials are stored, retrieved, or verified (for example, if you manage your own storage for credential_id and public keys), you can create a custom Relying Party class and pass it into the WebAuthnClient. This gives you full control over how the server interactions are managed.
Here’s an example of a custom Relying Party:
class CustomRelyingParty {
    constructor(host) {
        this.host = host;
        this.state = new RelyingPartyState();
    }

    login(username, password) {
        const loginPayload = {
            email: username,
            password: password,
        };

        return fetch(`${this.host}/custom-api/auth/login`, {
            method: 'POST',
            headers: { 'Content-Type': 'application/json' },
            body: JSON.stringify(loginPayload),
        })
        .then(response => response.json())
        .then(data => {
            this.state = new RelyingPartyState(data);
            return data;
        });
    }

    startRegistration() {
        const payload = { user_id: this.state.userID };
        return fetch(`${this.host}/custom-api/webauthn/registration/start`, {
            method: 'POST',
            headers: {
                'Authorization': `Bearer ${this.state.token}`,
                'Content-Type': 'application/json',
            },
            body: JSON.stringify(payload),
        })
        .then(response => response.json());
    }

    finishRegistration(credential) {
        const payload = {
            user_id: this.state.userID,
            credential,
        };

        return fetch(`${this.host}/custom-api/webauthn/registration/finish`, {
            method: 'POST',
            headers: {
                'Authorization': `Bearer ${this.state.token}`,
                'Content-Type': 'application/json',
            },
            body: JSON.stringify(payload),
        })
        .then(response => response.json());
    }

    // Implement other methods (startAuthentication, finishAuthentication, etc.) similarly
}

// Use the custom Relying Party in the WebAuthnClient
const customRelyingParty = new CustomRelyingParty("https://your-custom-host.com");
const client = new WebAuthnClient(customRelyingParty);

// Custom sign in flow
FIDO2Client.signIn('janedoe@example.com', 'securePassword!')
    .then(() => {
        console.log("Signed in using custom Relying Party");

        // Start the registration process using the custom Relying Party
        return FIDO2Client.webauthnCreate('janedoe@example.com');
    })
    .then((response) => {
        console.log("Custom WebAuthn registration complete", response);

        // Now authenticate the user using the custom Relying Party
        return FIDO2Client.webauthnGet('janedoe@example.com');
    })
    .then((data) => {
        console.log("Custom WebAuthn authentication successful", data);
    })
    .catch((error) => {
        console.error("Error during registration/authentication", error);
    });
Explanation
-
CustomRelyingParty Class:
- This class mimics the behavior of the default
RelyingPartyclass, but it uses a custom API endpoint (/custom-api/...) for managing authentication and WebAuthn interactions. - It maintains the same methods as the default Relying Party, such as
login,startRegistration,finishRegistration, and more.
- This class mimics the behavior of the default
-
Usage:
- You instantiate your custom Relying Party and pass it into the
WebAuthnClientconstructor. This allows theWebAuthnClientto interact with your custom API. - From here, the WebAuthnClient manages the WebAuthn process, while the custom Relying Party manages the server interactions.
- You instantiate your custom Relying Party and pass it into the
-
Flexibility:
- By implementing a custom Relying Party, you can tailor the behavior to match your own backend, authentication flows, and storage mechanisms.
- For example, if you store
credential_idin a database or use different APIs for managing public key credentials, you can adapt the Relying Party accordingly.
-
Key Considerations:
- Ensure that the custom Relying Party's API endpoints handle the WebAuthn protocol correctly, following FIDO2 standards.
- Security is paramount when handling credentials and tokens, so the custom Relying Party should use secure communication protocols (e.g., HTTPS) and implement proper token management (e.g., JWT expiration handling).
Summary
By default, the WebAuthnClient uses a built-in Relying Party to manage credential storage and verification. However, if you need more control or have a custom backend infrastructure, you can pass in your own Relying Party implementation, giving you flexibility to integrate FIDO2 authentication into any system. This modular approach ensures that developers can easily adopt WebAuthn while maintaining full control over server-side processes.
Working with React Native Applications
This section will focus on integration of the ZSM Client SDK into React Native-based applications.
Requirements
ZSM's React Native support extends to version 0.76 and later. This is required to support both the latest versions of iOS v.18 and Android v.7.0 (minSdk 24).
React Native apps may target iOS 15.1+ and Android 6.0+ (API 23+) or newer.
Note: that if you need to support older versions of iOS or Android, the ZSM Client SDK very well may support it as well, though we are no longer engaging in active development for these versions.
You may use Windows, macOS, or Linux as your development operating system, though building and running iOS apps is limited to macOS (note: tools like Expo SDK v49+ can be used to work around this).
Example React Native Project Files
Example implementations are included in the ZSM Client SDK in the folder examples.
Installation & Setup for React Native Applications
The ZSM Client SDK provides programmatic access to Ideem's FIDO2 Authentication functionality. This guide walks you through installing and configuring the SDK in a React Native project.
Step 1: Install the NPM Package
Run the following command from your project directory to install the ZSM Client SDK:
npm install @ideem/zsm-react-native --save
After installation, verify that your package.json includes (#.#.## will depend on the version installed):
"dependencies": {
    "@ideem/zsm-react-native": "^#.#.##"
}
Step 2: Import the ZSM Client SDK
Import the required client from the ZSM Client SDK into your React Native application:
FIDO2 Client:
import { FIDO2Client } from '@ideem/zsm-react-native';
Step 3: Set Up the Configuration File
Create a JSON configuration file or define a configuration object within your application. It should contain the following properties:
{
    "application_id": "XXXXXXXX-XXXX-XXXX-XXXX-XXXXXXXXXXXX",
    "host_url": "https://zsm-authenticator-demo.useideem.com/",
    "application_environment": "TEST",
    "api_key": "XXXXXXXX-XXXX-XXXX-XXXX-XXXXXXXXXXXX"
}
Configuration Properties
| Property Name | Data Type | Description | Example Value |
|---|---|---|---|
application_id | string | Unique application identifier provided by Ideem. | 123e4567-e89b-12d3-a456-426614174000 |
host_url | string | URL of the region-specific ZSM server provided by Ideem. | https://zsm-authenticator-demo.useideem.com/ |
application_environment | string | Environment setting (TEST or PRODUCTION). | TEST |
api_key | string | API key for authentication, provided by Ideem. | 33214443-c760-4f8e-924e-9a2ad5cb0bf6 |
These values will be provided by Ideem. Sample configurations for testing environments are included in the SDK's examples.
Step 4: Initialize the SDK
After importing the SDK and setting up the configuration file, initialize the client with the configuration object:
FIDO2 Client Initialization:
const client = new FIDO2Client(config);
Pass the config object defined in Step 3 into the initialization. This connects your application to the ZSM services using your credentials.
FIDO2 APIs for React Native Applications
Ideem's FIDO2Client provides an abstraction for integrating with WebAuthn and FIDO2 authentication in your React Native application. It simplifies managing interactions with a Relying Party (RP), handling user enrollment, and verifying authentication challenges.
The FIDO2Client handles:
- Checking if a user is enrolled (linked to a cryptographically bound account).
- Creating new credentials (user enrollment).
- Verifying existing credentials during authentication.
- Supporting step-up authentication for sensitive operations.
This document details the core methods and best practices for using the FIDO2Client.
Relying Party Overview
A Relying Party (RP) is a server or service that initiates WebAuthn-based authentication. The RP generates cryptographic challenges for user registration or login and verifies the returned signatures using stored credentials.
The steps typically involve:
- Registration: The RP generates a challenge and sends it to the user’s authenticator. Once the credential is created, the RP stores the credential ID and public key for future use.
- Authentication: The RP sends a challenge to the user's authenticator, receives a signed response, and verifies it using the associated public key.
The FIDO2Client abstracts these steps into simple methods, letting developers focus on integration.
Interface Definitions
Before proceeding, ensure you have imported the FIDO2Client from the ZSM React Native SDK:
import { FIDO2Client } from '@ideem/zsm-react-native';
Webauthn Retrieve: FIDO2Client.webauthnRetrieve()
This method retrieves the WebAuthn credential for a user, enabling the Relying Party to verify their enrollment status.
Parameters
| Parameter Name | Data Type | Description |
|---|---|---|
username | string | The username or identifier for the user. |
Returns
| Parameter Name | Data Type | Description |
|---|---|---|
response | PublicKeyCredential | Contains the user’s WebAuthn attestation data. |
Usage Example
client
  .webauthnRetrieve('exampleuser')
  .then((credential) => {
    console.log('Credential retrieved:', credential);
  })
  .catch((error) => {
    console.error('Error retrieving credential:', error.message);
  });
Webauthn Create: FIDO2Client.webauthnCreate()
This method registers a new WebAuthn credential for the user. It generates a key pair and securely binds the private key to the user and their device.
Parameters
| Parameter Name | Data Type | Description |
|---|---|---|
username | string | The username or identifier for the user. |
Returns
| Parameter Name | Data Type | Description |
|---|---|---|
credential | PublicKeyCredential | The newly created WebAuthn credential object. |
Usage Example
client
  .webauthnCreate('exampleuser')
  .then((credential) => {
    console.log('Credential created successfully:', credential);
  })
  .catch((error) => {
    console.error('Error creating credential:', error.message);
  });
Webauthn Get: FIDO2Client.webauthnGet()
This method authenticates a user by requesting their authenticator to sign a cryptographic challenge. The Relying Party verifies the signed response using the stored public key.
Parameters
| Parameter Name | Data Type | Description |
|---|---|---|
username | string | The username or identifier for the user. |
Returns
| Parameter Name | Data Type | Description |
|---|---|---|
assertion | PublicKeyCredential | The signed WebAuthn credential assertion object. |
Usage Example
client
  .webauthnGet('exampleuser')
  .then((result) => {
    console.log('Authentication successful:', result);
  })
  .catch((error) => {
    console.error('Error during authentication:', error.message);
  });
Example Code
Example of Default Flow: Registration and Authentication
Here’s a complete flow using the default Relying Party:
const client = new FIDO2Client(config);

const username = 'exampleuser';

// Check if the user is enrolled, and if not, create a credential
client
  .checkIdentity(username, true)
  .then(() => {
    console.log('Identity check complete');
    return client.webauthnCreate(username);
  })
  .then((credential) => {
    console.log('Credential created successfully:', credential);
    return client.webauthnGet(username);
  })
  .then((result) => {
    console.log('Authentication successful:', result);
  })
  .catch((error) => {
    console.error('Error in flow:', error.message);
  });
Custom Relying Party Example
If you need more control, create a custom Relying Party to handle credential storage and management:
class CustomRelyingParty {
  constructor(apiHost) {
    this.apiHost = apiHost;
  }

  async startRegistration(userId) {
    const response = await fetch(`${this.apiHost}/registration/start`, {
      method: 'POST',
      body: JSON.stringify({ userId }),
    });
    return response.json();
  }

  async finishRegistration(userId, credential) {
    const response = await fetch(`${this.apiHost}/registration/finish`, {
      method: 'POST',
      body: JSON.stringify({ userId, credential }),
    });
    return response.json();
  }
}

const customRelyingParty = new CustomRelyingParty('https://custom-rp.example.com');
const client = new FIDO2Client({ relyingParty: customRelyingParty });

client
  .checkIdentity('exampleuser', true)
  .then(() => console.log('Identity verified'))
  .catch((error) => console.error('Error verifying identity:', error.message));
Explanation
The FIDO2Client simplifies the integration of FIDO2 and WebAuthn by abstracting complex interactions with authenticators and Relying Parties. Below is a breakdown of how its key features work together:
-
Checking Identity:
- The
checkIdentitymethod ensures that the user's identity is either already registered or creates a new one if necessary. This serves as the first step in establishing a secure association between the user and the application.
- The
-
Creating Credentials:
- Using
webauthnCreate, the client generates a new cryptographic credential for the user. This step involves securely binding the credential to the user’s device, ensuring the private key never leaves the authenticator.
- Using
-
Retrieving Credentials:
- The
webauthnRetrievemethod allows the client to fetch stored credentials linked to the user. This is critical for verifying enrollment and determining the appropriate next step in the authentication process.
- The
-
Authentication:
- The
webauthnGetmethod facilitates secure user authentication by leveraging the stored credential. The authenticator signs a cryptographic challenge, which is verified by the Relying Party to confirm the user’s identity.
- The
-
Relying Party Abstraction:
- The
FIDO2Clientworks seamlessly with a default Relying Party setup but also allows for custom Relying Party implementations. This flexibility ensures the SDK can adapt to various backend architectures.
- The
-
Security and Compliance:
- By adhering to FIDO2 and WebAuthn standards, the client ensures secure and phishing-resistant authentication. Developers can integrate these advanced security features without needing deep expertise in cryptography or authentication protocols.
By following the default flow or implementing a custom Relying Party, developers can build robust, secure authentication workflows with minimal effort.
Summary
The FIDO2Client provides a simple and flexible way to integrate WebAuthn into your React Native applications. Its methods for credential management and authentication abstract the complexities of the FIDO2/WebAuthn standard, letting you focus on building secure user experiences.
For advanced use cases, such as custom Relying Party integration, the FIDO2Client offers extensibility while adhering to FIDO2 security standards.
Working with Android Applications
Adding the ZSM Client SDK to your Android project using Android Studio
System Requirements
- Android Phone
- AndroidOS 8 (API Level 26) and newer
Languages Supported
The following languages are supported by the ZSM Client SDK for Android development:
- Kotlin build 1.9.0 and newer
- Java 8 and newer
Tool Support
- Android Studio 3.1 and newer
Example Android Project Files
Example client app project files are included with the SDK along with sample code. They can be found in the examples folder of the SDK package:
-
UMFA Kotlin:
examples/umfa_kotlin
This is an example Universal MFA Android application written in Kotlin. It provides example use of the UMFAClient APIs: checkEnrollment, enroll, and authenticate. -
UMFA Java:
examples/umfa_java
This is an example Universal MFA Android application written in Java. It provides example use of the UMFAClient APIs: checkEnrollment, enroll, and authenticate. -
FIDO2 Kotlin:
examples/fido2_kotlin
This is an example FIDO2 Auth Android application written in Kotlin. It provides example use of the FIDO2Client APIs: webauthnRetrieve, webauthnCreate, and webauthnGet. -
FIDO2 Java:
examples/fido2_java
This is an example FIDO2 Auth Android application written in Java. It provides example use of the FIDO2Client APIs: webauthnRetrieve, webauthnCreate, and webauthnGet.
Setup for Native Android Applications
Adding the ZSM Client SDK to your Android project
Note: The sample applications can be built to either a physical Android phone or to a virtual device using the Android Studio Emulator. In either case, you must set up biometric authentication on the device. The Emulator provides a way to simulate biometric authentication.
Integration Steps
Step #1: Open Android Studio
Step #2: Create a new Project
Select from the available templates, or choose “Blank” to start an empty project from scratch.
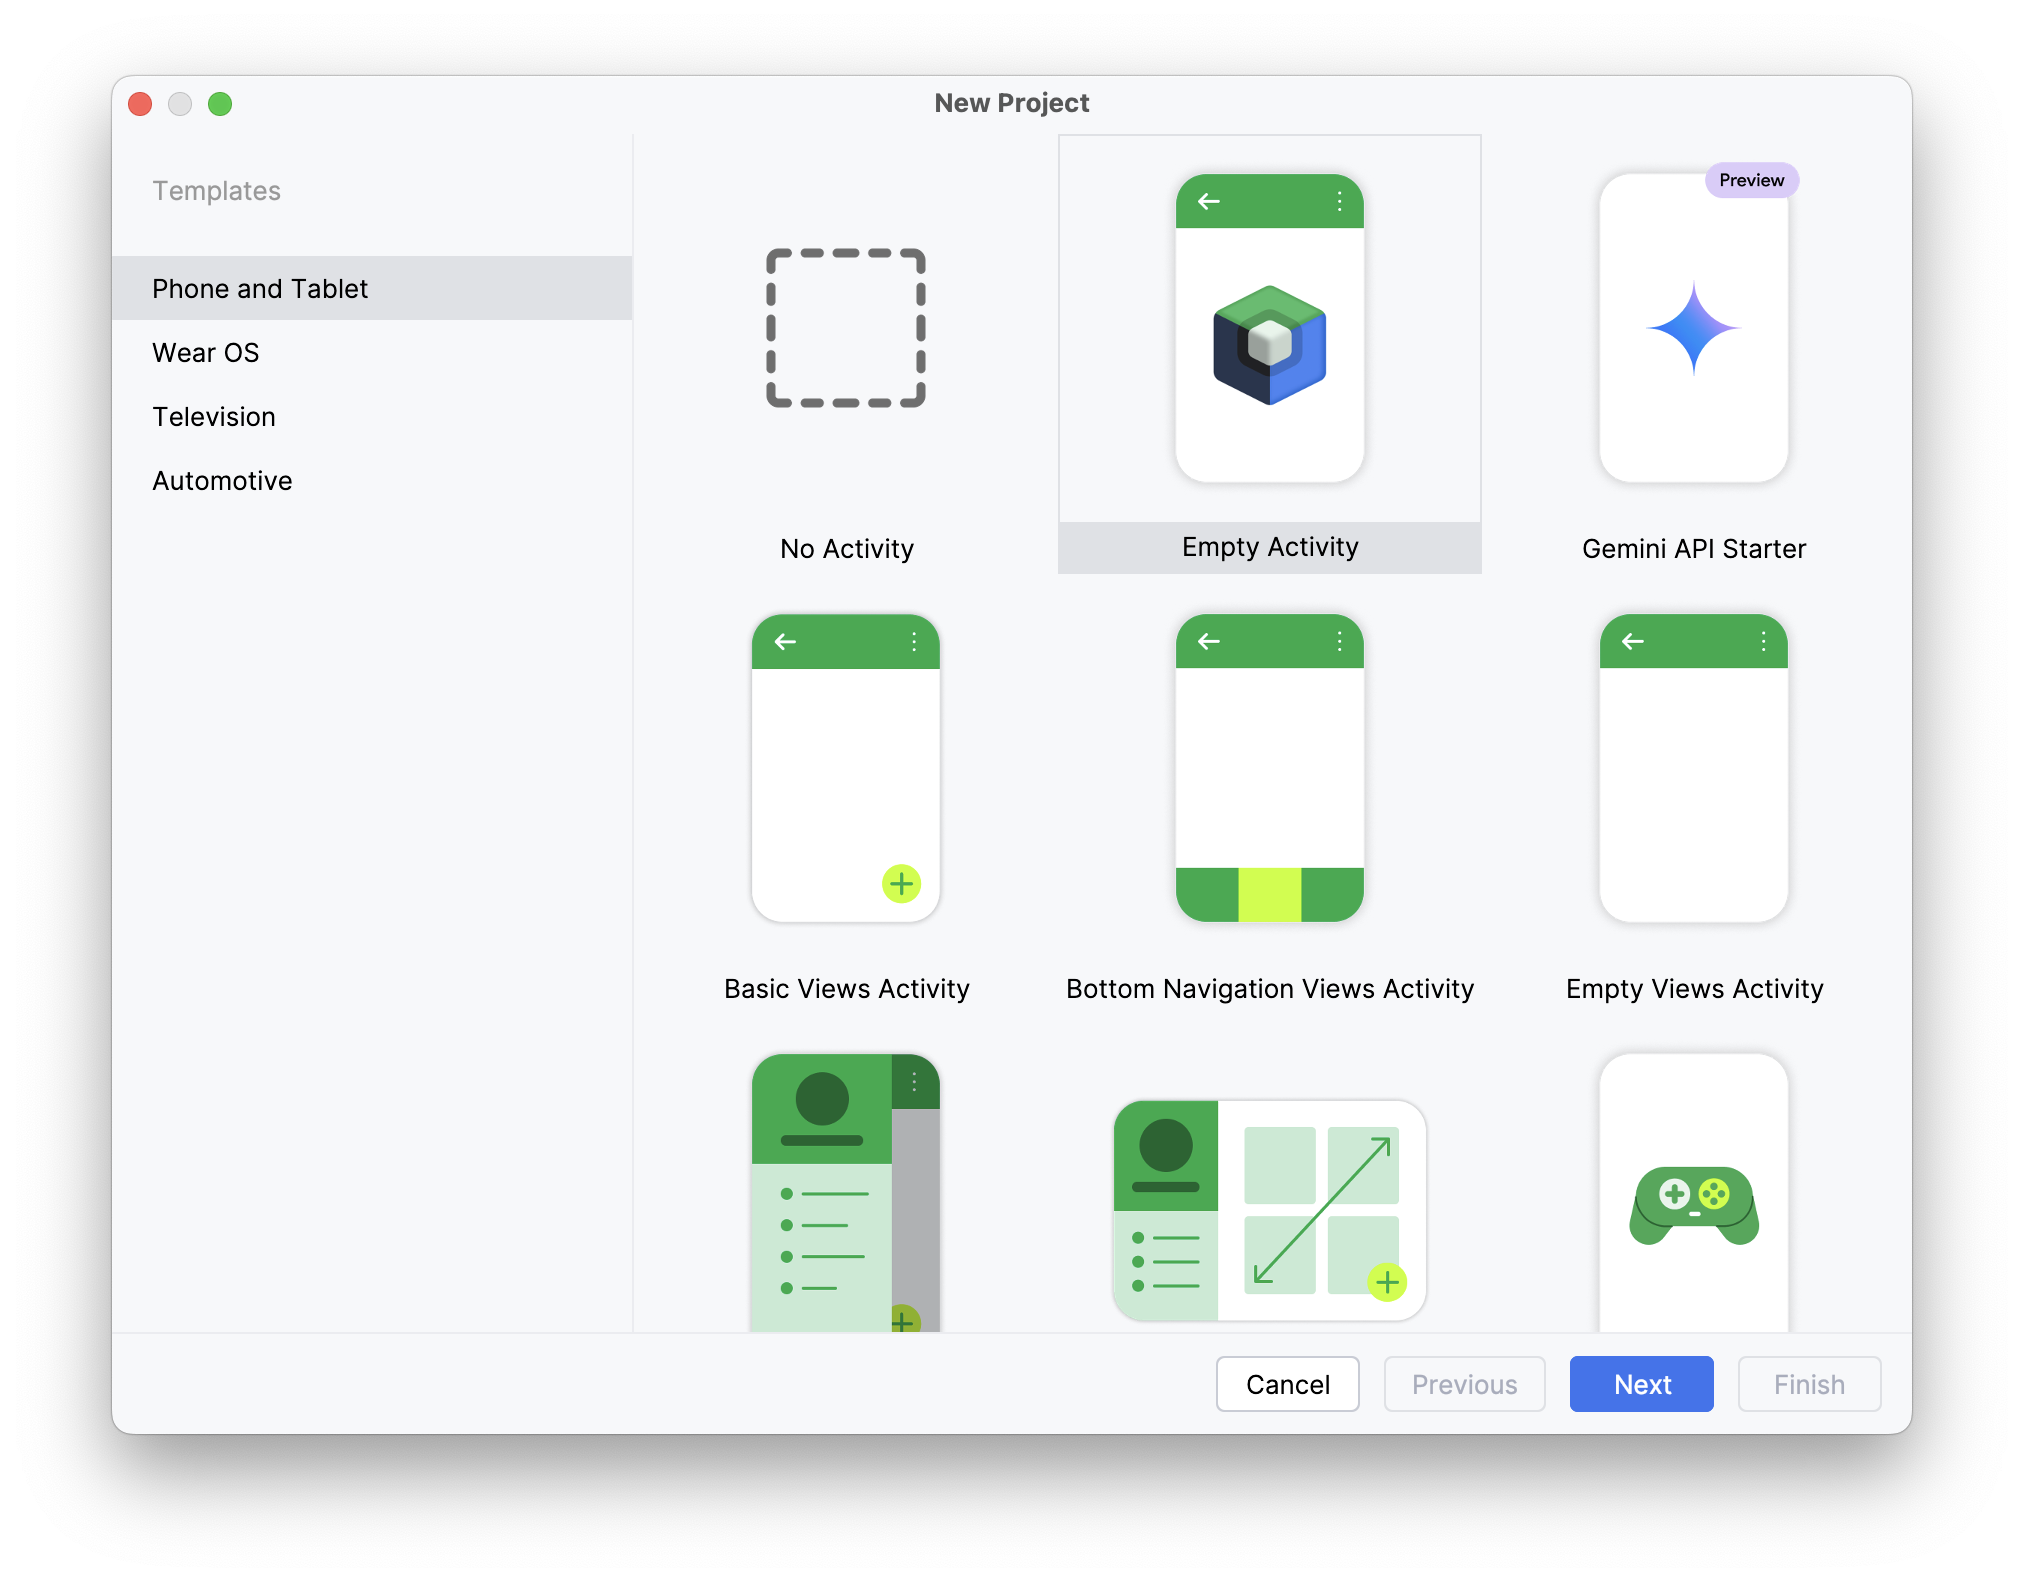
(NOTE: If working from an existing project, skip ahead to step 5.)
Step #3: Name the Project
Choose any name you would like and pick a folder you wish to save the project to. In this case, we will be calling it "Sample ZSM Integration" and scoping it to the “com.useideem.zsmclient.sample” namespace.
Step #4: Select the Programming Language You Wish to Use
Either Java or Kotlin.
Step #5: Select a Minimum Target Architecture
Choose the minimum target architecture and then click the Finish button. Keep in mind, the device architectures you intend to target will impact the set of features available to you (including biometrics). Be sure to be aware of your project's specific needs.
The ZSM Client SDK leverages CMake to produce a shared object (.so) to communicate with the ZSM Module and is designed to be universally compatible with the most number of platforms and devices as possible.
Although, selecting an API version below 23 could result in device limitations in functionality.
Step #6: Add the Library to the Project
Open the Import Module dialog, accessed by clicking File > New > Import Module.
The Import Module From Source dialog box will open.
Step #7: Select the Source Directory of the SDK
Ensure the Import checkbox is selected. Provide a name for the module (or leave the default suggestion in place). Then, click the Finish button.
Step #8: Specify the necessary plugins and dependencies in your Gradle file
Java Projects
For Java projects, the following plugins and depdencencies are required:
plugins {
    id 'com.android.application'
}

dependencies {
    implementation(files("../libs/ZSM.aar"))
}
Where the path to the ZSM.aar file is appropriate for your specific project structure. For an example, reference the build.gradle file provided in the example Java applications included with the SDK.
Kotlin Projects
For Kotlin projects, the following plugins and depdendencies are required:
plugins {
    id("com.android.application")
    id("org.jetbrains.kotlin.android")
}

dependencies {
    implementation(files("../libs/ZSM.aar"))
}
Where the path to the ZSM.aar file is appropriate for your specific project structure. For an example, reference the build.gradle.kts file provided in the example Kotlin applications included with the SDK.
Debugging & API Documentation
Debug Library
This SDK distribution also includes a debug version of the ZSM library (ZSM-debug.aar). This can be a valuable tool for local development and testing, as it includes helpful logs and debug symbols. The debug library SHOULD NOT but be used in a production deployment. An approach like the following can be setup in gradle for alternating between debug and release builds of the AAR:
- debugImplementation files('libs/ZSM-debug.aar')
- releaseImplementation files('libs/ZSM.aar')
IDE API Documentation
This SDK distribution also includes a zsm-javadoc.jar file that contains inline documentation for the SDK. This can be used to allow your IDE to show API descriptions and usage hints during development. It's optional and does not affect runtime behavior.
Here are the steps to use zsm-javadoc.jar in debug mode within Android Studio:
- Open Project Structure (
File > Project StructureorCmd/Ctrl + ;) - Go to the
Modules > Dependenciestab - Find the
ZSM-debug.aarentry - Click the pencil/edit icon ✏️ to edit the library
- In the dialog, click the “+” button next to “JavaDoc” and choose the
zsm-javadoc.jarfile
Android Initialization
Initialize a FIDO2Client instance from the ZSM module by creating an instance of the ZSMConfig class with the necessary configuration parameters such as host_url, application_id, and consumer_id. Then, use the FIDO2Client initializer to create the instance, which is required for performing all FIDO2 Auth operations.
Custom logging can be defined when initializing the FIDO2Client object. If a custom logging function is not provided, a default logging method is used. This method uses Android's built-in logging methods and maps to the LogLevel enum defined within the API.
Kotlin
Usage
 private fun initializeZSM() {
        val config = ZSMConfig(JSONObject().apply {
            put("host_url", hostUrl.value)
            put("application_id", applicationId.value)
            put("consumer_id", consumerId.value)

            logLevel = LogLevel.TRACE // Set the lowest level of logging
            logging = { _, message ->
                Log.d("Custom log", message)
            }
        })

        val client = FIDO2Client(context, config)
    }
Returns
The initialized FIDO2Client instance.
Configuration Parameters
Initialize the ZSMConfig object with the required configuration.
Parameters
| Parameter Name | Data Type | Description | Default Value |
|---|---|---|---|
host_url | String | The URL of the ZSM server. | Required |
application_id | String | The unique application identifier. | Required |
application_environment | String | The environment name (e.g., "TEST", "PROD"). | Required, "TEST" |
consumer_id | String | The consumer identifier. | Required |
authentication_host | String | Authentication service host URL (if different from host_url). | Same as host_url |
headers | JSONObject? | Headers used while performing remote transactions. | null |
metadata | JSONObject? | Metadata provided with the request. | null |
request_timeout_ms | UInt | Network timeout while performing remote transactions (in milliseconds). | 30000u |
retry_count | UInt | Number of retries for network transactions. | 0u |
perform_network_health_check | Boolean | Whether to perform a health check prior to instantiation. | false |
log_level | LogLevel | The logging level for the API. | .DEBUG |
mpc_algorithm | MPCAlgorithm | The encryption algorithm for transactions. | .ECDSAP256 |
requires_biometrics | Boolean | Whether to require biometrics (assumes implementation outside the API). | true |
logging | (LogLevel, String) -> Unit)? | A callback function for custom log handling. | null |
Configuring Logging
The ZSM SDK provides flexible logging configuration options. You can set the log level and provide a custom logging implementation to route log messages to your application's logging infrastructure.
Setting Log Level
You can set the log level either during initial configuration or after creating the ZSMConfig object:
// Option 1: During initialization
val config = ZSMConfig(JSONObject().apply {
    put("host_url", hostUrl)
    put("application_id", applicationId)
    put("consumer_id", consumerId)
    // Set log level directly in the config
    put("log_level", "TRACE")
})

// Option 2: After initialization
config.logLevel = LogLevel.TRACE
Custom Logging Implementation
You can provide a custom logging function that receives both the log level and message. This allows you to integrate with your application's logging infrastructure:
// Set custom logging function
config.logging = { level, message ->
    // Format the log message as needed
    val formattedMessage = "$level - $message"

    // Route to your logging system
    when (level) {
        LogLevel.TRACE -> Log.v("ZSM", formattedMessage)
        LogLevel.DEBUG -> Log.d("ZSM", formattedMessage)
        LogLevel.INFO -> Log.i("ZSM", formattedMessage)
        LogLevel.WARN -> Log.w("ZSM", formattedMessage)
        LogLevel.ERROR, LogLevel.FATAL -> Log.e("ZSM", formattedMessage)
    }
}
The logging function is called with two parameters:
level: A LogLevel enum value indicating the severitymessage: The log message as a String
Log Levels
enum class LogLevel(val value: Int) {
    TRACE(-1),
    DEBUG(0),
    INFO(1),
    WARN(2),
    ERROR(3),
    FATAL(4)
}
| Level | Description |
|---|---|
| TRACE | Used for debugging purposes. This level of logging provides the most granular information at the lowest detailed level and includes network round trips. |
| DEBUG | Used for debugging purposes. This reveals timing information at a general level. |
| INFO | Used to record informational messages that highlight the progress of the application at a high level. |
| WARN | Indicates potentially harmful situations. |
| ERROR | Used to record error events that might still allow the application to continue running. |
| FATAL | Records very severe error events that will presumably lead the application to abort. |
Returns
The initialized ZSMConfig object.
Java
The Java-friendly API allows the methods to be called using lambdas for seamless integration.
Usage
ZSMConfig config = new ZSMConfig(new JSONObject()
                    .put("host_url", this.getHostUrl())
                    .put("application_id", "########-####-####-####-############")
                    .put("consumer_id", this.getConsumerId())
            );

config.setLogLevel(LogLevel.TRACE); // Set the lowest level of logging
config.setLogging((level, message) -> {
    Log.d("Custom log", message);
});

FIDO2Client client = new FIDO2Client(context, config);
Returns
The initialized FIDO2Client instance.
ZSMConfig Properties
| Property | Type | Description | Default Value |
|---|---|---|---|
host_url | String | The URL of the ZSM server. | Required |
application_id | String | Unique application identifier | Required |
application_environment | String | The environment name (e.g., "TEST", "PROD"). | Required, "TEST" |
consumer_id | String | The consumer identifier. | Required |
authentication_host | String | Authentication service host URL (if different from host_url). | Same as host_url |
headers | JSONObject? | Headers used while performing remote transactions. | null |
metadata | JSONObject? | Metadata provided with the request. | null |
request_timeout_ms | int | Network timeout while performing remote transactions (in milliseconds). | 30000 |
retry_count | int | Number of retries for network transactions. | 0 |
perform_network_health_check | boolean | Whether to perform a health check prior to instantiation. | false |
log_level | LogLevel | The logging level for the API. | LogLevel.DEBUG |
mpc_algorithm | MPCAlgorithm | The encryption algorithm for transactions. | MPCAlgorithm.ECDSAP256 |
requires_biometrics | boolean | Whether to require biometrics (assumes implementation outside the API). | true |
logging | BiConsumer<LogLevel, String> | A callback function for custom log handling. | null |
Configuring Logging
The ZSM SDK provides flexible logging configuration options. You can set the log level and provide a custom logging implementation to route log messages to your application's logging infrastructure.
Setting Log Level
You can set the log level either during initial configuration or after creating the ZSMConfig object:
// Option 1: During initialization
JSONObject configJson = new JSONObject()
    .put("host_url", hostUrl)
    .put("application_id", applicationId)
    .put("consumer_id", consumerId)
    // Set log level directly in the config
    .put("log_level", "TRACE");

ZSMConfig config = new ZSMConfig(configJson);

// Option 2: After initialization
config.setLogLevel(LogLevel.TRACE);
Custom Logging Implementation
You can provide a custom logging function that receives both the log level and message. This allows you to integrate with your application's logging infrastructure:
// Set custom logging function
config.setLogging((level, message) -> {
    // Format the log message as needed
    String formattedMessage = level + " - " + message;

    // Route to your logging system
    switch (level) {
        case TRACE:
            Log.v("ZSM", formattedMessage);
            break;
        case DEBUG:
            Log.d("ZSM", formattedMessage);
            break;
        case INFO:
            Log.i("ZSM", formattedMessage);
            break;
        case WARN:
            Log.w("ZSM", formattedMessage);
            break;
        case ERROR:
        case FATAL:
            Log.e("ZSM", formattedMessage);
            break;
    }
});
The logging function is called with two parameters:
level: A LogLevel enum value indicating the severitymessage: The log message as a String
Log Levels
enum LogLevel {
    TRACE(-1),
    DEBUG(0),
    INFO(1),
    WARN(2),
    ERROR(3),
    FATAL(4);
}
| Level | Description |
|---|---|
| TRACE | Used for debugging purposes. This level of logging provides the most granular information at the lowest detailed level and includes network round trips. |
| DEBUG | Used for debugging purposes. This reveals timing information at a general level. |
| INFO | Used to record informational messages that highlight the progress of the application at a high level. |
| WARN | Indicates potentially harmful situations. |
| ERROR | Used to record error events that might still allow the application to continue running. |
| FATAL | Records very severe error events that will presumably lead the application to abort. |
Returns
The initialized ZSMConfig object.
FIDO2 APIs for Native Android Applications
Ideem's FIDO2 Authenticator interfaces can be used to integrate with an existing Relying Party infrastructure. A Relying Party server is responsible for managing the storage of credential_ids and public keys associated with enrollments, generating challenges, and verifying signed challenges.
These interfaces allow you to determine if a user has already been enrolled (cryptographically bound to the device), create an enrollment if they have not, or verify them. FIDO2 Authenticator WebAuthn functions can be used to provide a silent second factor after strong authentication, as well as reverification when needed for transactions requiring step up authentication.
Interface Definitions
Getting the version number of the SDK library: FIDO2Client.versionString
To retrieve the version number of the SDK library use the class property FIDO2Client.versionString. It will return the version number in semantic versioning format, major.minor.patch.
Kotlin
Retrieving Enrollment Status: FIDO2Client.webauthnRetrieve()
There are two versions of this method: one for retrieving credentials for the current user, and another for retrieving credentials for a specific user.
For Current User
The webauthnRetrieve method checks if the current user has previously registered credentials on this device and retrieves the enrollment status.
Usage
client.webauthnRetrieve { response ->
    if (response != null) {
        val rawId = response.getString("rawId")
        // Handle retrieved attestation data
    } else {
        Log.e("FIDO2ClientViewModel", "Error retrieving attestation data")
    }
}
Parameters
| Parameter Name | Data Type | Description |
|---|---|---|
completion | (JSONObject?) -> Unit | A callback function that handles the completion of the retrieval. |
Returns
The callback function returns the following parameter:
| Parameter Name | Data Type | Description |
|---|---|---|
response | JSONObject? | The retrieved enrollment status (attestation data) as a JSON object, or null if not found. |
For Specific User
The webauthnRetrieve method with a user parameter checks if a specific user has previously registered credentials on this device and retrieves the enrollment status.
Usage
val userId = "user123" // Unique identifier for the user
client.webauthnRetrieve(userId) { response ->
    if (response != null) {
        val rawId = response.getString("rawId")
        // Handle retrieved attestation data for specific user
    } else {
        Log.e("FIDO2ClientViewModel", "Error retrieving attestation data for user: $userId")
    }
}
Parameters
| Parameter Name | Data Type | Description |
|---|---|---|
user | String | The user ID for which to retrieve credentials. |
completion | (JSONObject?) -> Unit | A callback function that handles the completion of the retrieval. |
Returns
The callback function returns the following parameter:
| Parameter Name | Data Type | Description |
|---|---|---|
response | JSONObject? | The retrieved enrollment status (attestation data) as a JSON object, or null if not found. |
Enrolling (Attestation): FIDO2Client.webauthnCreate()
The webauthnCreate method initiates the creation of a new credential object using the specified PublicKeyCredentialCreationOptions. The generated credential object can be stored securely for future authentication.
The response follows the PublicKeyCredential format from the WebAuthn standard.
Refer to Mozilla's online documentation on PublicKeyCredentialCreationOptions or to the W3C standard Options for Credential Creation. For response format, see the W3C standard PublicKeyCredential interface.
Usage
client.webauthnCreate(optionsJsonObject) { result, metadata, error ->
    if (result != null) {
        val rawId = result.getString("rawId")
        // Handle successful creation, store or use the rawId
    } else if (error != null) {
        Log.e("FIDO2ClientViewModel", "Error during creation: ${error.localizedMessage}")
    }
}
Parameters
| Parameter Name | Data Type | Description |
|---|---|---|
options | JSONObject | A JSON object representing PublicKeyCredentialCreationOptions. |
completion | (JSONObject?, Map<String, String>?, ZSMError?) -> Unit | A callback function that handles the completion of the operation. |
Returns
The callback function returns the following parameters:
| Parameter Name | Data Type | Description |
|---|---|---|
result | JSONObject? | The attestation data generated during credential creation as a JSON object. |
metadata | Map<String, String>? | Additional metadata associated with the creation process. |
error | ZSMError? | Error object in case of failure; otherwise, null. |
Verifying (Assertion): FIDO2Client.webauthnGet()
The webauthnGet method retrieves a credential object based on the specified PublicKeyCredentialRequestOptions. This object can be used to authenticate the user.
The response follows the AuthenticatorAssertionResponse format from the WebAuthn standard.
Refer to Mozilla's online documentation on PublicKeyCredentialRequestOptions or to the W3C standard Options for Assertion Generation. For response format, see the W3C standard AuthenticatorAssertionResponse interface.
Usage
client.webauthnGet(optionsJsonObject) { result, metadata, error ->
    if (result != null) {
        // Handle successful assertion
    } else if (error != null) {
        Log.e("FIDO2ClientViewModel", "Error during assertion: ${error.localizedMessage}")
    }
}
Parameters
| Parameter Name | Data Type | Description |
|---|---|---|
options | JSONObject | A JSON object representing PublicKeyCredentialRequestOptions. |
completion | (JSONObject?, Map<String, String>?, ZSMError?) -> Unit | A callback function that handles the completion of the operation. |
Returns
The callback function returns the following parameters:
| Parameter Name | Data Type | Description |
|---|---|---|
result | JSONObject? | The assertion data generated during credential verification as a JSON object. |
metadata | Map<String, String>? | Additional metadata associated with the request process. |
error | ZSMError? | Error object in case of failure; otherwise, null. |
Unbind: FIDO2Client.unbind()
There are two versions of this method: one for removing all FIDO2 credentials for the current user, and another for removing credentials for a specific user.
For Current User
The unbind method removes all FIDO2 credentials and state for the current user from the device.
Usage
client.unbind { success ->
    if (success) {
        Log.d("FIDO2ClientViewModel", "Successfully unbind FIDO2 state for current user")
    } else {
        Log.e("FIDO2ClientViewModel", "Failed to unbind FIDO2 state")
    }
}
Parameters
| Parameter Name | Data Type | Description |
|---|---|---|
completion | (Boolean) -> Unit | A callback function that handles the completion of the unbind operation. |
Returns
The callback function returns the following parameter:
| Parameter Name | Data Type | Description |
|---|---|---|
success | Boolean | Indicates whether the unbind operation was successful. |
For Specific User
The unbind method with a user parameter removes FIDO2 credentials and state for a specific user from the device.
Usage
val userId = "user123" // Unique identifier for the user
client.unbind(userId) { success ->
    if (success) {
        Log.d("FIDO2ClientViewModel", "Successfully unbind FIDO2 state for user: $userId")
    } else {
        Log.e("FIDO2ClientViewModel", "Failed to unbind FIDO2 state for user: $userId")
    }
}
Parameters
| Parameter Name | Data Type | Description |
|---|---|---|
user | String | The user ID for which to remove credentials. |
completion | (Boolean) -> Unit | A callback function that handles the completion of the unbind operation. |
Returns
The callback function returns the following parameter:
| Parameter Name | Data Type | Description |
|---|---|---|
success | Boolean | Indicates whether the unbind operation was successful. |
Java
Retrieving Enrollment Status: FIDO2Client.webauthnRetrieve()
There are two versions of this method: one for retrieving credentials for the current user, and another for retrieving credentials for a specific user.
For Current User
The webauthnRetrieve method checks if the current user has previously registered credentials on this device and retrieves the enrollment status.
Usage
client.webauthnRetrieve(response -> {
    if (response != null) {
        try {
            String rawId = response.getString("rawId");
            // Handle retrieved attestation data
        } catch (JSONException e) {
            Log.e("FIDO2ClientViewModel", "Error parsing JSON response: " + e.getMessage());
        }
    } else {
        Log.e("FIDO2ClientViewModel", "Error retrieving attestation data");
    }
});
Parameters
| Parameter Name | Data Type | Description |
|---|---|---|
completion | WebAuthnRetrieveCompletionHandler | A callback interface that handles the completion of the retrieval. |
The WebAuthnRetrieveCompletionHandler interface has a single method:
void onComplete(JSONObject result);
Returns
The callback function returns the following parameter:
| Parameter Name | Data Type | Description |
|---|---|---|
result | JSONObject? | The retrieved enrollment status (attestation data) as a JSON object, or null if not found. |
For Specific User
The webauthnRetrieve method with a user parameter checks if a specific user has previously registered credentials on this device and retrieves the enrollment status.
Usage
String userId = "user123"; // Unique identifier for the user
client.webauthnRetrieve(userId, response -> {
    if (response != null) {
        try {
            String rawId = response.getString("rawId");
            // Handle retrieved attestation data for specific user
        } catch (JSONException e) {
            Log.e("FIDO2ClientViewModel", "Error parsing JSON response: " + e.getMessage());
        }
    } else {
        Log.e("FIDO2ClientViewModel", "Error retrieving attestation data for user: " + userId);
    }
});
Parameters
| Parameter Name | Data Type | Description |
|---|---|---|
user | String | The user ID for which to retrieve credentials. |
completion | WebAuthnRetrieveCompletionHandler | A callback interface that handles the completion of the retrieval. |
Returns
The callback function returns the following parameter:
| Parameter Name | Data Type | Description |
|---|---|---|
result | JSONObject? | The retrieved enrollment status (attestation data) as a JSON object, or null if not found. |
Enrolling (Attestation): FIDO2Client.webauthnCreate()
The webauthnCreate method initiates the creation of a new credential object using the specified PublicKeyCredentialCreationOptions. The generated credential object can be stored securely for future authentication.
Refer to Mozilla's PublicKeyCredentialCreationOptions documentation or the W3C Options for Credential Creation.
Usage
client.webauthnCreate(optionsJsonObject, (result, metadata, error) -> {
    if (result != null) {
        try {
            String rawId = result.getString("rawId");
            // Handle successful creation, store or use the rawId
        } catch (JSONException e) {
            Log.e("FIDO2ClientViewModel", "Error parsing JSON response: " + e.getMessage());
        }
    } else if (error != null) {
        Log.e("FIDO2ClientViewModel", "Error during creation: " + error.getLocalizedMessage());
    }
});
Parameters
| Parameter Name | Data Type | Description |
|---|---|---|
options | JSONObject | A JSON object representing PublicKeyCredentialCreationOptions. |
completion | WebAuthnCompletionHandler | A callback interface that handles the completion of the operation. |
The WebAuthnCompletionHandler interface has a single method:
void onComplete(JSONObject result, Map<String, String> metadata, ZSMError error);
Returns
The callback function returns the following parameters:
| Parameter Name | Data Type | Description |
|---|---|---|
result | JSONObject? | The attestation data generated during credential creation as a JSON object. |
metadata | Map<String, String>? | Additional metadata associated with the creation process. |
error | ZSMError? | Error object in case of failure; otherwise, null. |
Verifying (Assertion): FIDO2Client.webauthnGet()
The webauthnGet method retrieves a credential object based on the specified PublicKeyCredentialRequestOptions. This object can be used to authenticate the user.
Refer to Mozilla's PublicKeyCredentialRequestOptions documentation or the W3C Options for Assertion Generation.
Usage
client.webauthnGet(optionsJsonObject, (result, metadata, error) -> {
    if (result != null) {
        // Handle successful assertion
    } else if (error != null) {
        Log.e("FIDO2ClientViewModel", "Error during assertion: " + error.getLocalizedMessage());
    }
});
Parameters
| Parameter Name | Data Type | Description |
|---|---|---|
options | JSONObject | A JSON object representing PublicKeyCredentialRequestOptions. |
completion | WebAuthnCompletionHandler | A callback interface that handles the completion of the operation. |
Returns
The callback function returns the following parameters:
| Parameter Name | Data Type | Description |
|---|---|---|
result | JSONObject? | The assertion data generated during credential verification as a JSON object. |
metadata | Map<String, String>? | Additional metadata associated with the request process. |
error | ZSMError? | Error object in case of failure; otherwise, null. |
Unbind: FIDO2Client.unbind()
There are two versions of this method: one for removing all FIDO2 credentials for the current user, and another for removing credentials for a specific user.
For Current User
The unbind method removes all FIDO2 credentials and state for the current user from the device.
Usage
client.unbind(success -> {
    if (success) {
        Log.d("FIDO2ClientViewModel", "Successfully unbound FIDO2 state for current user");
    } else {
        Log.e("FIDO2ClientViewModel", "Failed to unbind FIDO2 state");
    }
});
Parameters
| Parameter Name | Data Type | Description |
|---|---|---|
completion | BooleanCompletionHandler | A callback interface that handles the completion of the unbind operation. |
The BooleanCompletionHandler interface has a single method:
void onComplete(boolean success);
Returns
The callback function returns the following parameter:
| Parameter Name | Data Type | Description |
|---|---|---|
success | boolean | Indicates whether the unbind operation was successful. |
For Specific User
The unbind method with a user parameter removes FIDO2 credentials and state for a specific user from the device.
Usage
String userId = "user123"; // Unique identifier for the user
client.unbind(userId, success -> {
    if (success) {
        Log.d("FIDO2ClientViewModel", "Successfully unbound FIDO2 state for user: " + userId);
    } else {
        Log.e("FIDO2ClientViewModel", "Failed to unbind FIDO2 state for user: " + userId);
    }
});
Parameters
| Parameter Name | Data Type | Description |
|---|---|---|
user | String | The user ID for which to remove credentials. |
completion | BooleanCompletionHandler | A callback interface that handles the completion of the unbind operation. |
Returns
The callback function returns the following parameter:
| Parameter Name | Data Type | Description |
|---|---|---|
success | boolean | Indicates whether the unbind operation was successful. |
Working with iOS Applications
Adding the ZSM Client SDK to your iOS project using Xcode
System Requirements
- Apple iPhone 5s and newer
- Apple iOS 11 and newer
Languages Supported
The following languages are supported by the Client SDK for iOS development:
- Swift 4 and newer
- Objective-C (set by the version of CLANG supported by Xcode 9)
Tool Support
- Xcode 9 and newer
Example iOS Project Files
Example client app project files are included with the SDK along with sample code. They can be found in the examples folder of the SDK package:
-
UMFA Swift:
examples/umfa_swift
This is an example Universal MFA iOS application written in Swift. It provides example use of the UMFAClient APIs: checkEnrollment, enroll, and authenticate. -
UMFA Objective-C:
examples/umfa_objc
This is an example Universal MFA iOS application written in Objective-C. It provides example use of the UMFAClient APIs: checkEnrollment, enroll, and authenticate. -
FIDO2 Swift:
examples/fido2_swift
This is an example FIDO2 Auth iOS application written in Swift. It includes provides example use of the FIDO2Client APIs: webauthnRetrieve, webauthnCreate, and webauthnGet. -
FIDO2 Objective-C:
examples/fido2_objc
This is an example FIDO2 Auth iOS application written in Objective-C. It includes provides example use of the FIDO2Client APIs: webauthnRetrieve, webauthnCreate, and webauthnGet.
Setup for Native iOS Applications
Adding the ZSM Client SDK to your iOS project
Note: The sample application must be built to a physical iPhone due to limitations of the Xcode Simulator.
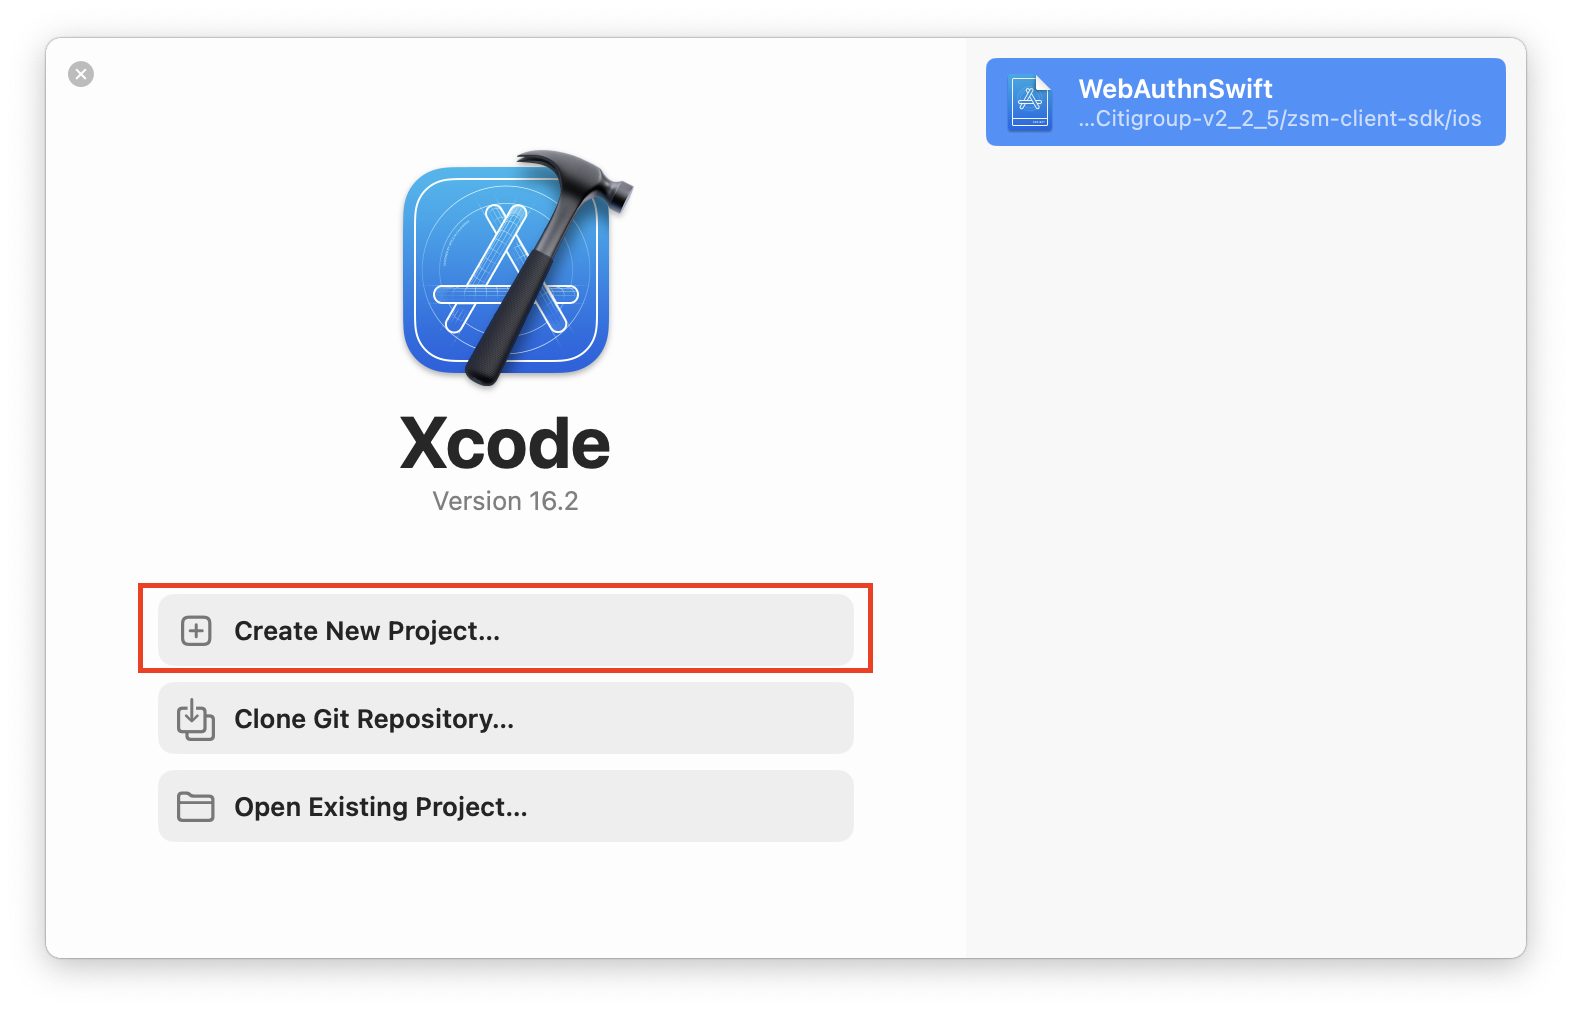
Step #1: Open Xcode
Step #2: Create a new Project
Select the topmost option from the quick launch menu. (NOTE: If working from an existing project, skip ahead to step 6.)
Step #3: Select a Platform and Template
In this case, we will prepare the project as an App intended to be run on the iOS platform. After making your selections, click the Next button to proceed.
Step #4: Name the Project
Choose any name you would like. Then, select your team (note that this is needed to perform a full build after adding the ZSM Client SDK to the project for it to function for testing purposes. Add your organization's name, and finally select the language you wish to employ. We'll be using Swift for the purposes of this example). Click the Next button.
Step #5: Decide Where You Would Like to Save the Project
Once you navigate to your desired save location in the Finder dialog, click Finish.
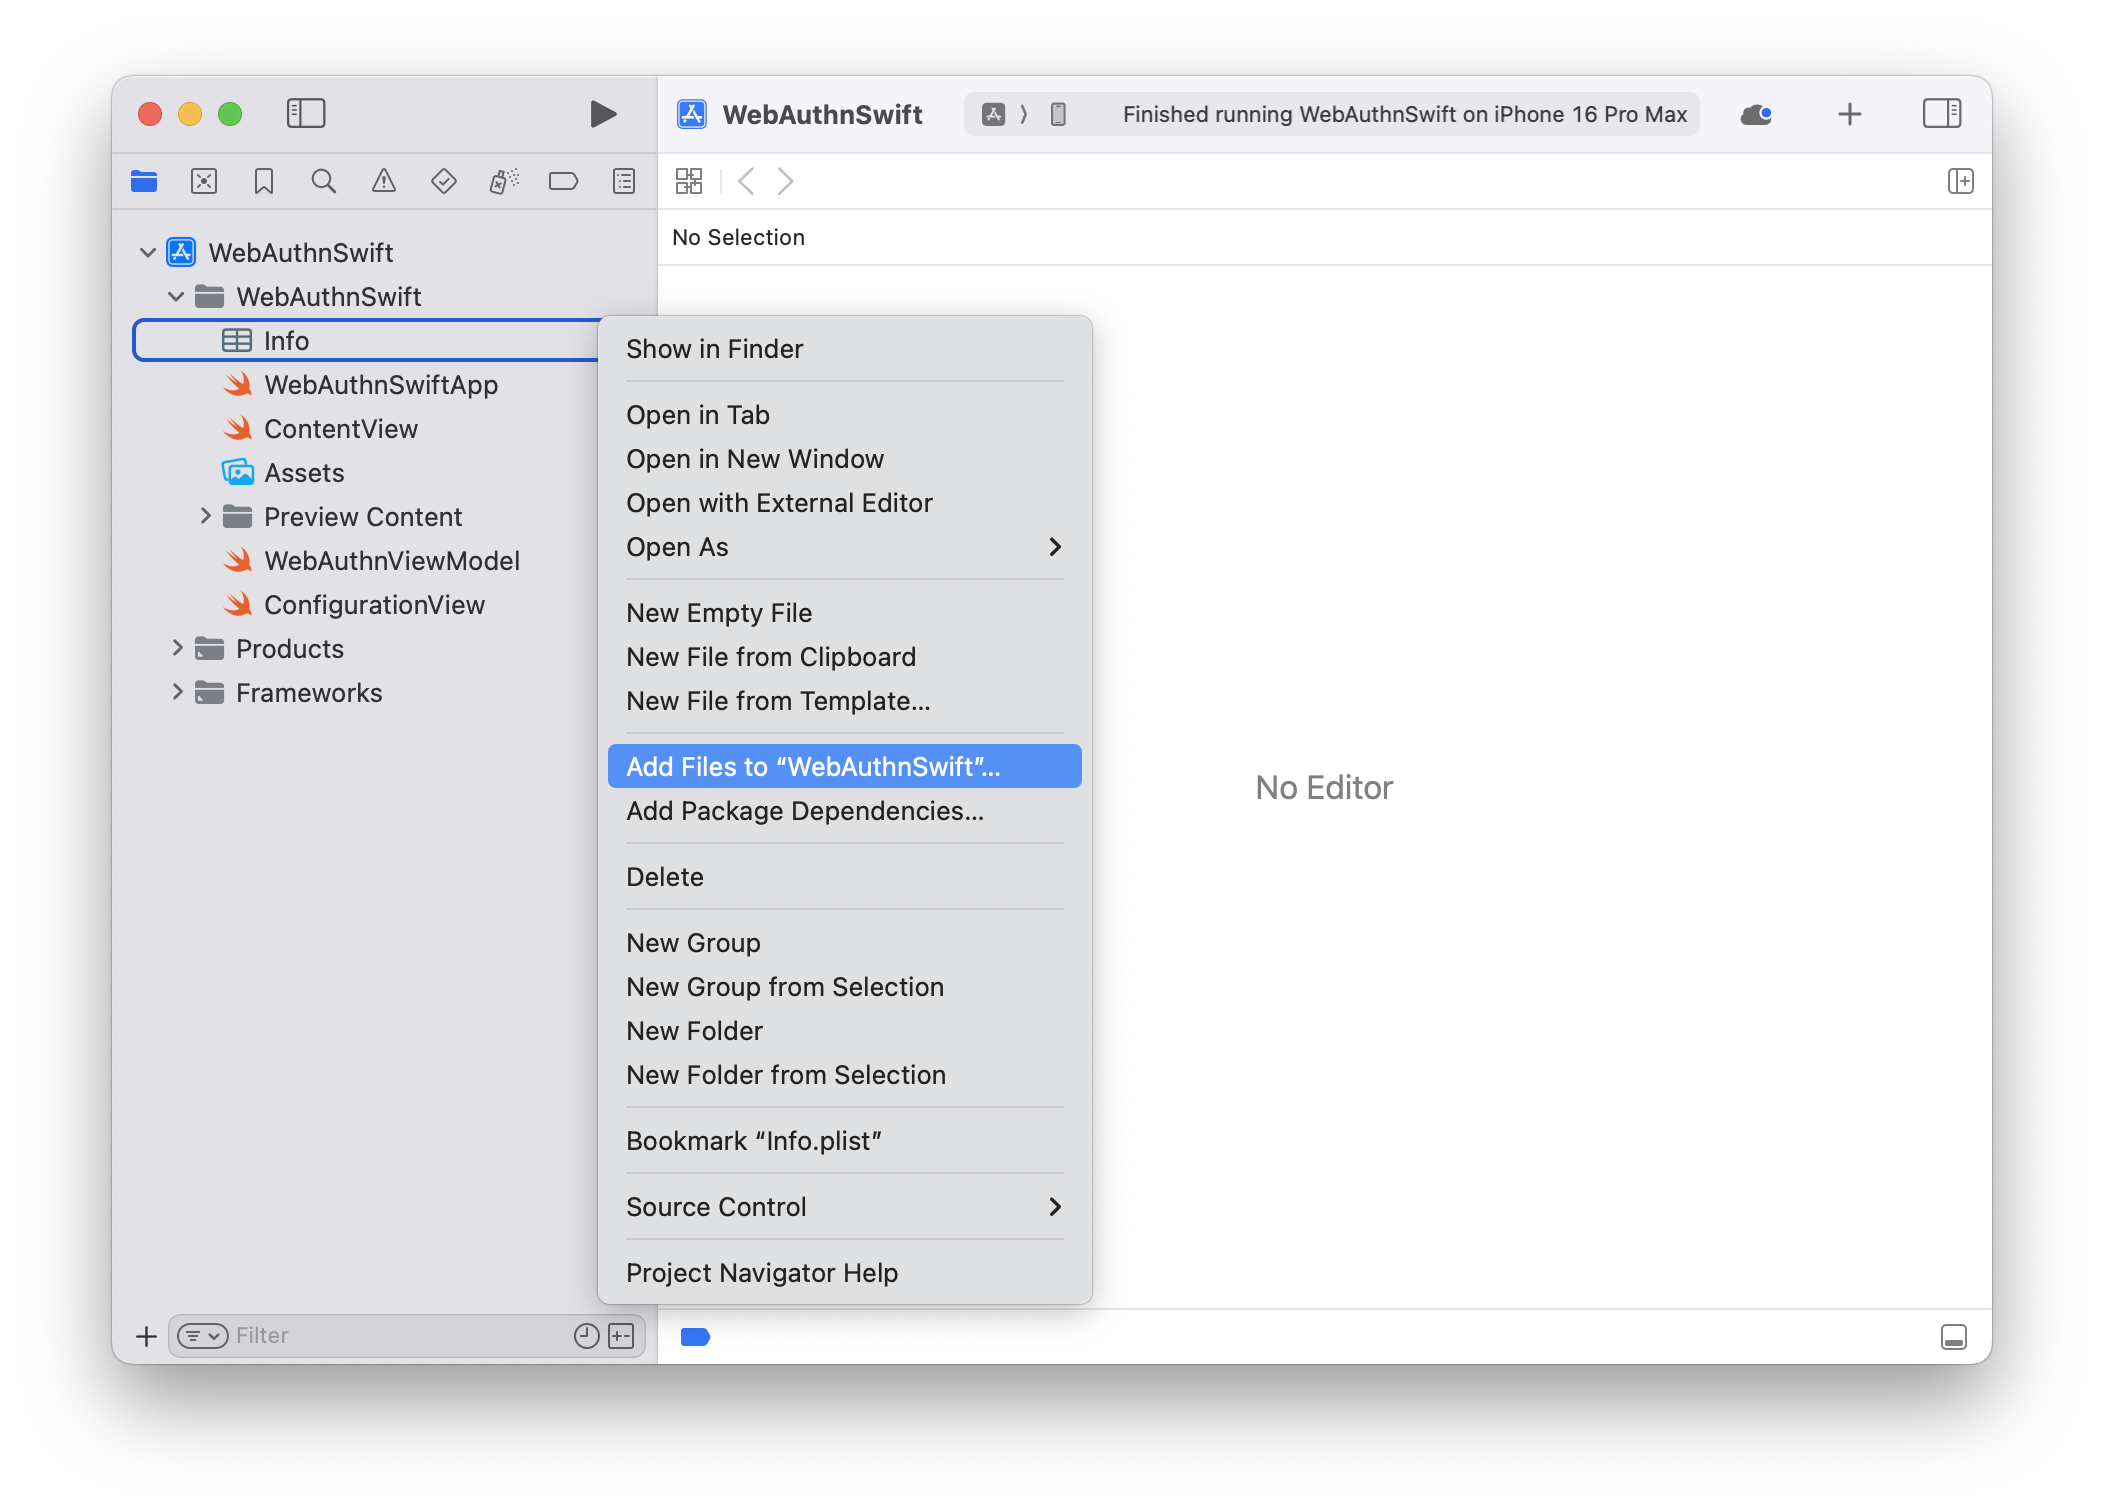
Step #6: Add the Framework to the Project
Right-click on the side panel, and select Add Files to “<YOUR_PROJECT>”
Browse to the folder location into which you saved the ZSM Client SDK and select the Framework directory contained therein.
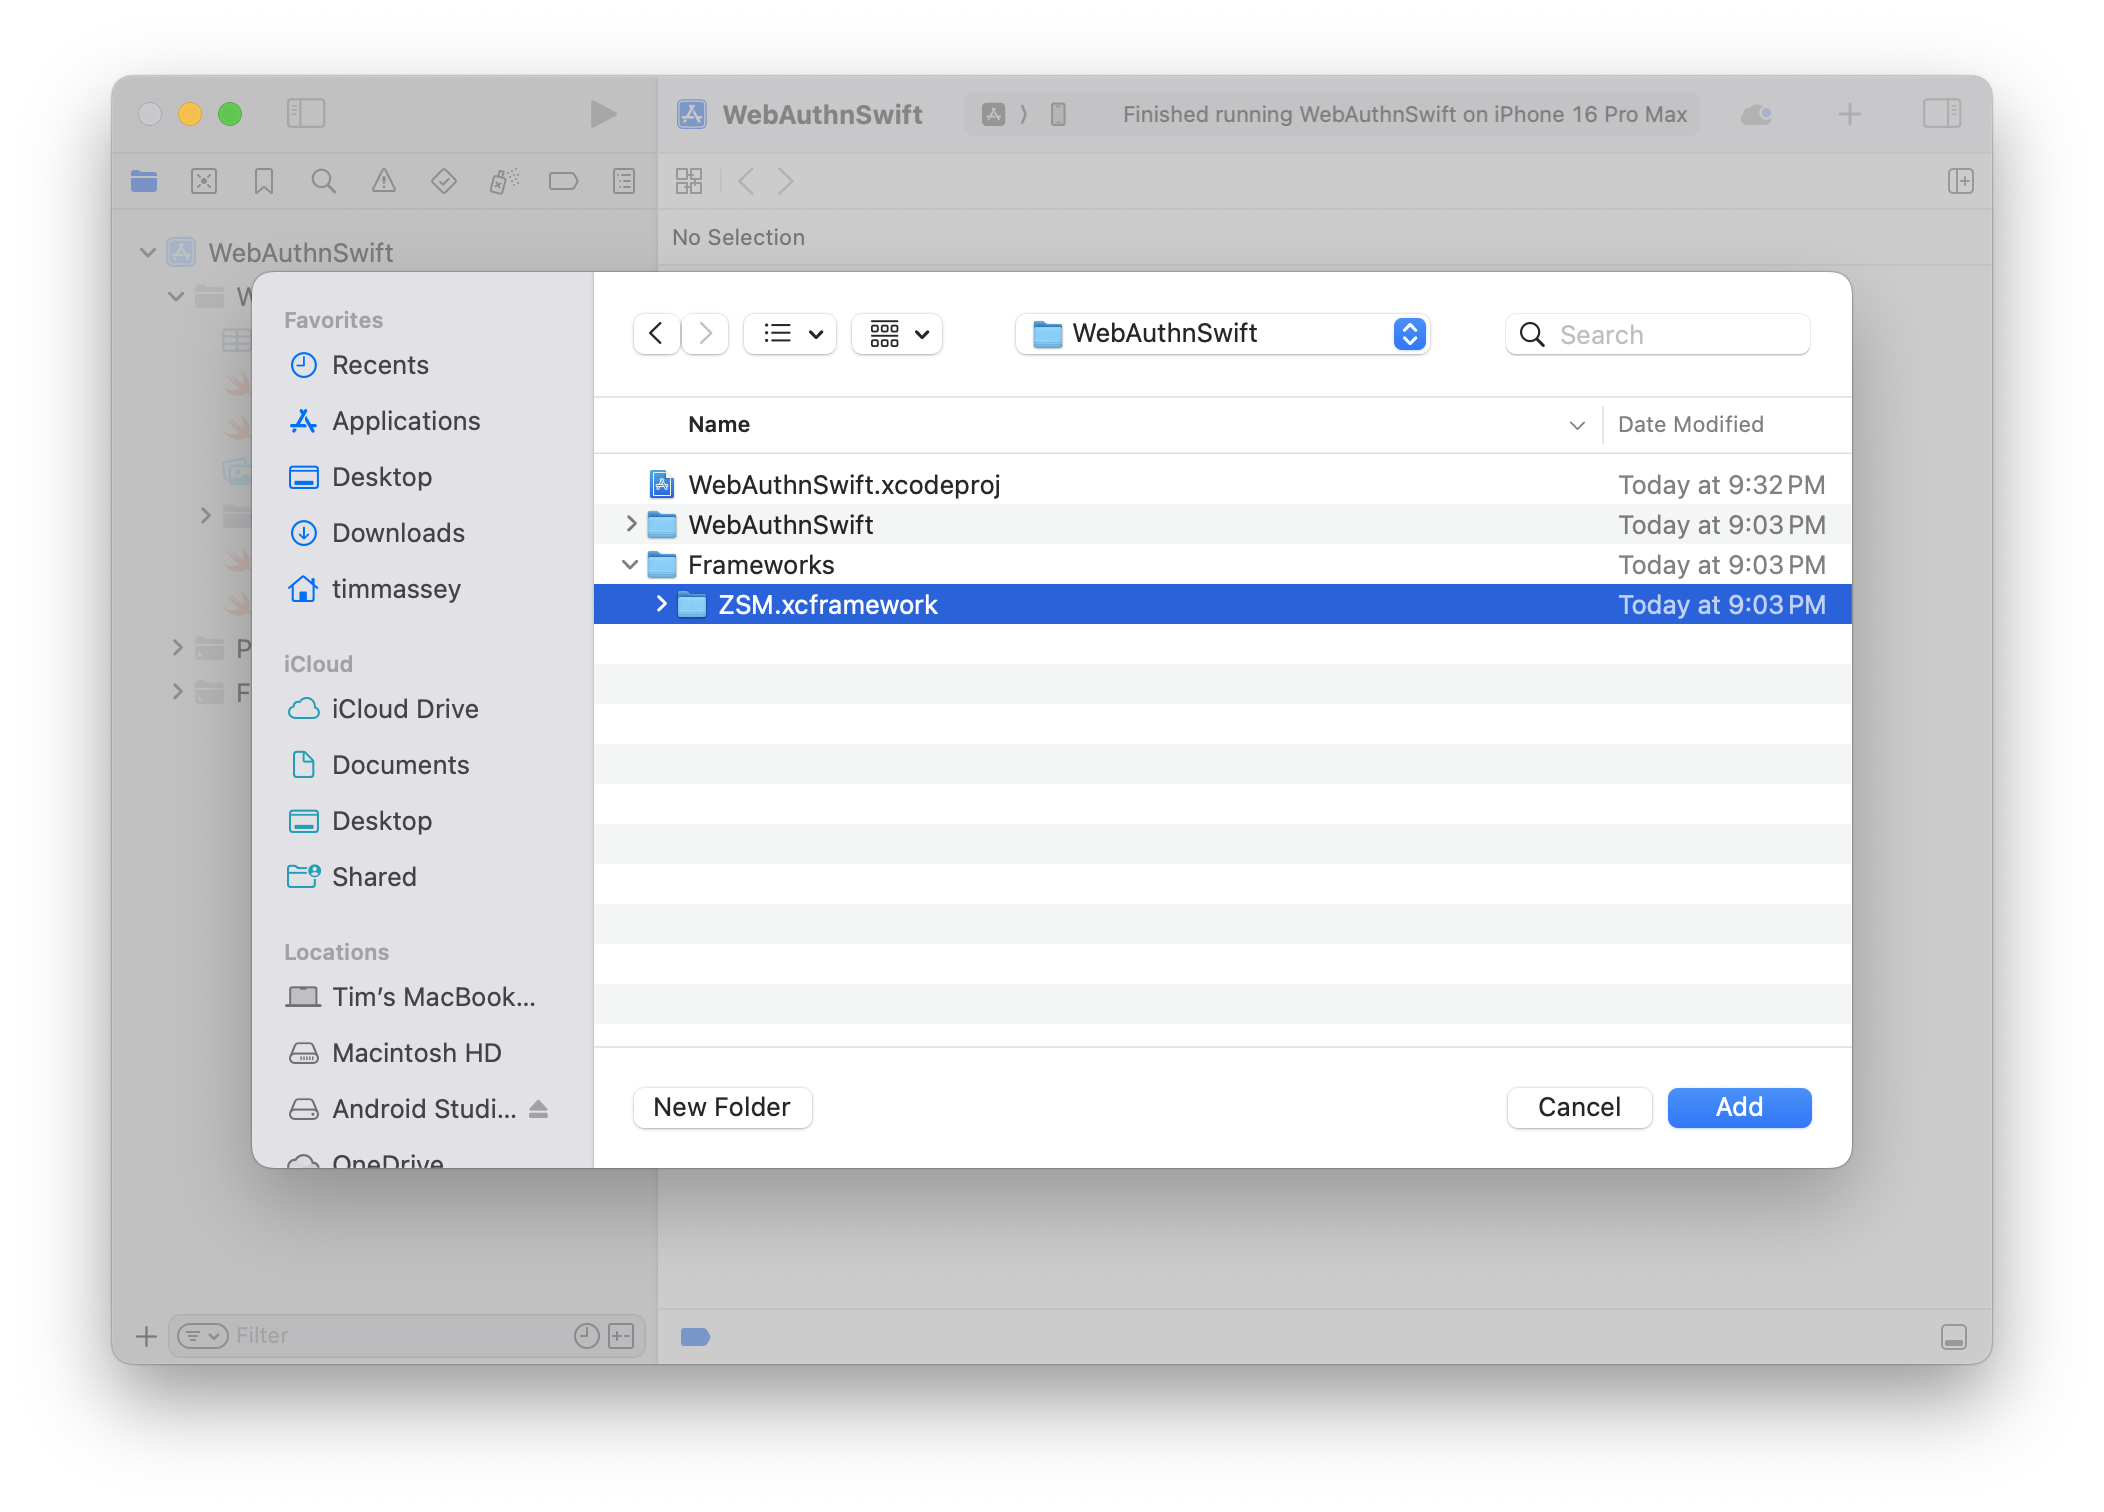
Step #7: Ensure the Add to Targets Checkbox is Selected
Optionally select Copy Items (if you're creating the project in a different location, or intend to create more than one using the framework).
Step #8: Finally, Click the Add button.
Your project structure should now resemble the following:
iOS Initialization
Jump to: Swift, Objective-C
Initialize a FIDO2Client instance from the ZSM module by creating an instance of the ZSMConfig class with the necessary configuration parameters such as host_url, application_id, and consumer_id. Then, use the FIDO2Client constructor to initialize the instance, which is required for performing all FIDO2 Auth operations.
Custom logging can be defined when initializing a FIDO2Client object. If a custom logging function is not provided, a default logging method is used. This method uses iOS's built-in logging methods and maps to the LogLevel enum defined within the API.
Swift
Initialization
Usage
func initializeFIDO2Client() {
        let config = ZSMConfig(json: [
            "host_url": hostUrl,
            "application_id": applicationId,
            "application_environment": "TEST",
            "consumer_id": consumerId
        ])

        config.logLevel = .Debug
        config.logFunction = { level, message in
            print("[\(level)] \(message)")
        }
        let client = FIDO2Client(config)
    }
Returns
The initialized FIDO2Client instance.
Configuration Parameters
Initialize the ZSMConfig object with the required configuration.
Parameters
| Parameter Name | Data Type | Description | Default Value |
|---|---|---|---|
host_url | NSURL | The URL of the ZSM server. | Required |
application_id | NSString | The environment name (e.g., "TEST", "PROD"). | Required |
consumer_id | NSString | The consumer identifier. | Required |
application_environment | NSString | The environment name (e.g., "TEST", "PROD"). | Required, "TEST" |
request_timeout_ms | NSUInteger | Network timeout while performing remote transactions (in milliseconds). | 30000 |
retry_count | NSUInteger | Number of retries for network transactions. | 0 |
perform_network_health_check | BOOL | Whether to perform a health check prior to instantiation. | YES |
headers | NSDictionary | Headers used while performing remote transactions. | nil |
metadata | NSDictionary | Metadata used while performing remote transactions. | nil |
keychain_group | NSString? | Shared keychain group ID for multiple applications of the same vendor. | nil |
mpc_algorithm | MPCAlgorithm | The encryption algorithm for transactions. | .ECDSAP256 |
requires_biometrics | BOOL | Whether to bypass biometrics (assuming implementation outside the API). | NO |
logLevel | LogLevel | The logging level for the API. | .Info |
log_function | (LogLevel, NSString) -> Void | A callback function for custom log handling. | nil |
Configuring Logging
The ZSM SDK provides flexible logging configuration options. You can set the log level and provide a custom logging implementation to route log messages to your application's logging infrastructure.
Setting Log Level
You can set the log level either during initialization or after creating the ZSMConfig object:
// Option 1: During initialization via JSON
let config = ZSMConfig(json: [
    "host_url": hostUrl,
    "application_id": applicationId,
    "consumer_id": consumerId,
    "log_level": LogLevel.trace.rawValue // Set log level in the configuration
])

// Option 2: After initialization
config.logLevel = .trace
Custom Logging Implementation
You can provide a custom logging function to capture and process log messages in your application:
// Set custom logging function
config.logFunction = { level, message in
    // Format and route logs as needed
    let formattedMessage = "[\(level)] \(message)"

    switch level {
    case .trace:
        os_log("%{public}@", log: .default, type: .debug, formattedMessage)
    case .debug:
        os_log("%{public}@", log: .default, type: .debug, formattedMessage)
    case .info:
        os_log("%{public}@", log: .default, type: .info, formattedMessage)
    case .warn:
        os_log("%{public}@", log: .default, type: .error, formattedMessage)
    case .error, .fatal:
        os_log("%{public}@", log: .default, type: .fault, formattedMessage)
    @unknown default:
        os_log("%{public}@", log: .default, type: .default, formattedMessage)
    }
}
The logging function is called with two parameters:
level: A LogLevel enum value indicating the severitymessage: The log message as a String
You can use this callback to integrate with various logging frameworks such as:
- Apple's unified logging system (os_log)
- CocoaLumberjack
- Custom logging solutions
LogLevel Enum
enum LogLevel: Int {
    case trace = -1
    case debug = 0
    case info = 1
    case warn = 2
    case error = 3
    case fatal = 4
}
LogLevel Descriptions
| Level | Description |
|---|---|
| LogLevelTrace | Used for debugging purposes. Provides the most granular information at the lowest detailed level, including network round trips. |
| LogLevelDebug | Provides general timing information for debugging purposes. |
| LogLevelInfo | Used for recording informational messages that highlight the application's progress at a high level. |
| LogLevelWarn | Indicates potentially harmful situations. |
| LogLevelError | Used for recording error events that might still allow the application to continue running. |
| LogLevelFatal | Used for recording severe error events that will presumably lead the application to abort. |
Returns
The initialized ZSMConfig object.
Objective-C
Initialization
Usage
NSURL *hostUrl = [NSURL URLWithString:@"https://zsm-host-server-address"];
NSString *applicationId = @"########-####-####-####-############"
NSString *consumerId = @"consumer123";

ZSMConfig *config = [[ZSMConfig alloc] initWithJSON:@{@"host_url": hostUrl, @"application_id":applicationId,
@"consumer_id":consumerId}];

config.logLevel = LogLevelDebug;
config.logFunction = ^(LogLevel level, NSString *message) {
    NSLog(@"[%ld] %@", (long)level, message);
};

FIDO2Client *client = [[FIDO2Client alloc] initWithConfig:config];
Returns
The initialized FIDO2Client instance.
Configuration Parameters
Initialize the ZSMConfig object with the required configuration.
Parameters
| Parameter Name | Data Type | Description | Default Value |
|---|---|---|---|
host_url | NSURL * | The URL of the ZSM server. | Required |
application_id | NSString * | Unique application identifier. | Required |
consumer_id | NSString * | The consumer identifier. | Required |
application_environment | NSString * | The environment name (e.g., "TEST", "PROD"). | Required, "TEST" |
request_timeout_ms | NSUInteger | Network timeout while performing remote transactions (in milliseconds). | 30000 (30s) |
retry_count | NSUInteger | Number of retries for network transactions. | 0 |
perform_network_health_check | BOOL | Whether to perform a health check prior to instantiation. | YES |
headers | NSDictionary * | Headers used while performing remote transactions. | nil |
metadata | NSDictionary * | Metadata used while performing remote transactions. | nil |
keychain_group | NSString * | Shared keychain group ID for multiple applications of the same vendor. | nil |
mpc_algorithm | MPCAlgorithm | The encryption algorithm for transactions. | .MPCAlgorithmECDSAP256 |
requires_biometrics | BOOL | Whether to bypass biometrics (assuming implementation outside the API). | NO |
log_level | LogLevel | The logging level for the API. | .LogLevelInfo |
log_function | ZSMLoggingCallback | A callback function for custom log handling. | nil |
LogLevel Enum
typedef NS_ENUM(NSInteger, LogLevel) {
    LogLevelTrace = -1,
    LogLevelDebug = 0,
    LogLevelInfo,
    LogLevelWarn,
    LogLevelError,
    LogLevelFatal
};
Configuring Logging
The ZSM SDK provides flexible logging configuration options for Objective-C applications. You can set the log level and provide a custom logging implementation to route log messages to your application's logging infrastructure.
Setting Log Level
You can set the log level either during initialization or after creating the ZSMConfig object:
// Option 1: During initialization via JSON dictionary
NSDictionary *configDict = @{
    @"host_url": hostUrlString,
    @"application_id": applicationId,
    @"consumer_id": consumerId,
    @"log_level": @(LogLevelTrace)  // Set log level in the configuration
};
ZSMConfig *config = [[ZSMConfig alloc] initWithJSON:configDict];

// Option 2: After initialization
config.logLevel = LogLevelTrace;
Custom Logging Implementation
You can provide a custom logging function to capture and process log messages in your application:
// Set custom logging function with a block
config.logFunction = ^(LogLevel level, NSString *message) {
    // Format and route logs as needed
    NSString *levelString;
    switch (level) {
        case LogLevelTrace:
            levelString = @"TRACE";
            break;
        case LogLevelDebug:
            levelString = @"DEBUG";
            break;
        case LogLevelInfo:
            levelString = @"INFO";
            break;
        case LogLevelWarn:
            levelString = @"WARN";
            break;
        case LogLevelError:
            levelString = @"ERROR";
            break;
        case LogLevelFatal:
            levelString = @"FATAL";
            break;
        default:
            levelString = @"UNKNOWN";
            break;
    }

    NSString *formattedMessage = [NSString stringWithFormat:@"[%@] %@", levelString, message];

    // Route to your logging system
    NSLog(@"%@", formattedMessage);

    // Or use os_log if targeting iOS 10+
    if (@available(iOS 10.0, *)) {
        os_log_with_type(OS_LOG_DEFAULT, OS_LOG_TYPE_INFO, "%{public}@", formattedMessage);
    }
};
The logging function is called with two parameters:
level: A LogLevel enum value indicating the severitymessage: The log message as an NSString
You can use this callback to integrate with various logging frameworks such as:
- NSLog (basic logging)
- Apple's unified logging system (os_log)
- CocoaLumberjack
- Custom logging solutions
LogLevel Enum
typedef NS_ENUM(NSInteger, LogLevel) {
    LogLevelTrace = -1,
    LogLevelDebug = 0,
    LogLevelInfo,
    LogLevelWarn,
    LogLevelError,
    LogLevelFatal
};
LogLevel Descriptions
| Level | Description |
|---|---|
| LogLevelTrace | Used for debugging purposes. Provides the most granular information at the lowest detailed level, including network round trips. |
| LogLevelDebug | Provides general timing information for debugging purposes. |
| LogLevelInfo | Used for recording informational messages that highlight the application's progress at a high level. |
| LogLevelWarn | Indicates potentially harmful situations. |
| LogLevelError | Used for recording error events that might still allow the application to continue running. |
| LogLevelFatal | Used for recording severe error events that will presumably lead the application to abort. |
Returns
The initialized ZSMConfig object.
FIDO2 APIs for Native iOS Applications
Ideem's FIDO2 Authenticator interfaces can be used to integrate with an existing Relying Party infrastructure, where you host the Relying Party server and manage the storage of credential_ids and public keys associated with enrollments, generate challenges, and verify signed challenges.
These interfaces allow you to determine if a user has already been enrolled (cryptographically bound to the device), create an enrollment if they have not, or verify them. FIDO2 Authenticator WebAuthn functions can be used to provide a silent second factor after strong authentication, as well as reverification when needed for transactions requiring step up authentication.
Interface Definitions
Jump to: Swift, Objective-C
Getting the version number of the SDK library: FIDO2Client.versionString
To retrieve the version number of the SDK library use the class property FIDO2Client.versionString. It will return the version number in semantic versioning format, major.minor.patch.
Swift
Retrieving Enrollment Status (Attestation): FIDO2Client.webauthnRetrieve()
There are two versions of this method: one for retrieving credentials for the current user, and another for retrieving credentials for a specific user.
For Current User
The webauthnRetrieve(completion:) method checks if the current user has previously registered credentials on this device and retrieves the enrollment status.
Usage
client.webauthnRetrieve { data, metadata, error in
    if let data = data {
        // Process attestation data
        if let rawId = data["rawId"] as? String {
            // Use the credential ID
        }
    } else if let error = error {
        // Handle error
    }
}
Parameters
| Parameter Name | Data Type | Description |
|---|---|---|
completion | ([String: Any]?, [String: String]?, ZSMError?) -> Void | A callback function that handles the completion of the retrieval. |
Returns
The completion handler provides the following parameters:
| Parameter Name | Data Type | Description |
|---|---|---|
data | [String: Any]? | The enrollment status (attestation data) retrieved from the device as a dictionary. |
metadata | [String: String]? | Additional metadata associated with the retrieval process. |
error | ZSMError? | Error object in case of failure; otherwise, nil. |
For Specific User
The webauthnRetrieve(forUser:completion:) method checks if a specific user has previously registered credentials on this device and retrieves the enrollment status.
Usage
let userId = "user123" // Unique identifier for the user
client.webauthnRetrieve(forUser: userId) { data, metadata, error in
    if let data = data {
        // Process attestation data for specific user
        if let rawId = data["rawId"] as? String {
            // Use the credential ID for this specific user
        }
    } else if let error = error {
        // Handle error
    }
}
Parameters
| Parameter Name | Data Type | Description |
|---|---|---|
user | String | The user ID for which to retrieve credentials. |
completion | ([String: Any]?, [String: String]?, ZSMError?) -> Void | A callback function that handles the completion of the retrieval. |
Returns
The completion handler provides the following parameters:
| Parameter Name | Data Type | Description |
|---|---|---|
data | [String: Any]? | The enrollment status (attestation data) retrieved for the specified user as a dictionary. |
metadata | [String: String]? | Additional metadata associated with the retrieval process. |
error | ZSMError? | Error object in case of failure; otherwise, nil. |
Enrolling (Attestation): FIDO2Client.webauthnCreate()
The webauthnCreate(options:completion:) method initiates the creation of a new credential object, using the specified PublicKeyCredentialCreationOptions. The generated credential object can be stored securely for future authentication.
The response follows the PublicKeyCredential format from the WebAuthn standard.
Refer to Mozilla's online documentation on PublicKeyCredentialCreationOptions or to the W3C standard Options for Credential Creation. For response format, see the W3C standard PublicKeyCredential interface.
Usage
// Create options dictionary following FIDO2 WebAuthn standard
let options: [String: Any] = [
    "rp": [
        "id": "example.com",
        "name": "Example Service"
    ],
    "user": [
        "id": "user-unique-id-as-base64",
        "name": "username",
        "displayName": "User's Display Name"
    ],
    "challenge": "base64-encoded-challenge",
    "pubKeyCredParams": [
        ["type": "public-key", "alg": -7] // ES256
    ]
    // Additional optional parameters
]

client.webauthnCreate(options: options) { data, metadata, error in
    if let data = data {
        // Handle successful creation, access attestationObject and clientDataJSON
        if let rawId = data["rawId"] as? String {
            // Store credential ID for future authentications
        }
    } else if let error = error {
        // Handle error
    }
}
Parameters
| Parameter Name | Data Type | Description |
|---|---|---|
options | [String: Any] | A dictionary representing PublicKeyCredentialCreationOptions. |
completion | ([String: Any]?, [String: String]?, ZSMError?) -> Void | A callback function that handles the completion of the operation. |
Returns
The completion handler provides the following parameters:
| Parameter Name | Data Type | Description |
|---|---|---|
data | [String: Any]? | The attestation data generated during credential creation as a dictionary. |
metadata | [String: String]? | Additional metadata associated with the creation process. |
error | ZSMError? | Error object in case of failure; otherwise, nil. |
Verifying (Assertion): FIDO2Client.webauthnGet()
The webauthnGet(options:completion:) method retrieves a credential object based on the specified PublicKeyCredentialRequestOptions. This object can be used to authenticate the user.
The response follows the AuthenticatorAssertionResponse format from the WebAuthn standard.
Refer to Mozilla's online documentation on PublicKeyCredentialRequestOptions or to the W3C standard Options for Assertion Generation. For response format, see the W3C standard AuthenticatorAssertionResponse interface.
Usage
// Create options dictionary following FIDO2 WebAuthn standard
let options: [String: Any] = [
    "challenge": "base64-encoded-challenge",
    "rpId": "example.com",
    "allowCredentials": [
        [
            "type": "public-key",
            "id": "previously-stored-credential-id"
        ]
    ],
    "timeout": 60000
]

client.webauthnGet(options: options) { data, metadata, error in
    if let data = data {
        // Handle successful assertion
        if let authenticatorData = data["authenticatorData"] as? String,
           let signature = data["signature"] as? String {
            // Verify the signature and authenticator data
        }
    } else if let error = error {
        // Handle error
    }
}
Parameters
| Parameter Name | Data Type | Description |
|---|---|---|
options | [String: Any] | A dictionary representing PublicKeyCredentialRequestOptions. |
completion | ([String: Any]?, [String: String]?, ZSMError?) -> Void | A callback function that handles the completion of the operation. |
Returns
The completion handler provides the following parameters:
| Parameter Name | Data Type | Description |
|---|---|---|
data | [String: Any]? | The assertion data generated during credential verification as a dictionary. |
metadata | [String: String]? | Additional metadata associated with the request process. |
error | ZSMError? | Error object in case of failure; otherwise, nil. |
Unbinding: FIDO2Client.unbind()
There are two versions of this method: one for removing all FIDO2 credentials for the current user, and another for removing credentials for a specific user.
For Current User
The unbind() method removes all FIDO2 credentials and state for the current user from the device.
Usage
client.unbind()
Parameters
None.
Returns
None. |
For Specific User
The unbind(user:) method removes FIDO2 credentials and state for a specific user from the device.
Usage
let userId = "user123" // Unique identifier for the user
client.unbind(user: userId);
Parameters
| Parameter Name | Data Type | Description |
|---|---|---|
user | String | The user ID for which to remove credentials. |
Returns
None. |
Objective-C
Retrieving Enrollment Status (Attestation): FIDO2Client.webauthnRetrieve()
There are two versions of this method: one for retrieving credentials for the current user, and another for retrieving credentials for a specific user.
For Current User
To check if the current user has previously registered credentials on this device and retrieve the enrollment status, use the webauthnRetrieveWithCompletion: method.
Usage
[client webauthnRetrieveWithCompletion:^(NSDictionary * _Nullable data, NSDictionary<NSString *, NSString *> * _Nullable metadata, ZSMError * _Nullable error) {
    if (data) {
        // Process attestation data
    } else if (error) {
        // Handle error
    }
}];
Parameters
| Parameter Name | Data Type | Description |
|---|---|---|
completion | void (^)(NSDictionary * _Nullable, NSDictionary<NSString *, NSString *> * _Nullable, ZSMError * _Nullable) | A callback function that handles the completion of the retrieval operation. |
Returns
The callback function receives the following parameters:
| Parameter Name | Data Type | Description |
|---|---|---|
data | NSDictionary * | The enrollment status (attestation data) retrieved from the device as a dictionary. |
metadata | NSDictionary<NSString *, NSString *> * | Additional metadata returned by the operation, if available. |
error | ZSMError * | Error object describing any issues encountered during the retrieval process. |
For Specific User
To check if a specific user has previously registered credentials on this device and retrieve the enrollment status, use the webauthnRetrieveForUser:withCompletion: method.
Usage
NSString *userId = @"user123"; // Unique identifier for the user
[client webauthnRetrieveForUser:userId withCompletion:^(NSDictionary * _Nullable data, NSDictionary<NSString *, NSString *> * _Nullable metadata, ZSMError * _Nullable error) {
    if (data) {
        // Process attestation data for specific user
    } else if (error) {
        // Handle error
    }
}];
Parameters
| Parameter Name | Data Type | Description |
|---|---|---|
user | NSString * | The user ID for which to retrieve credentials. |
completion | void (^)(NSDictionary * _Nullable, NSDictionary<NSString *, NSString *> * _Nullable, ZSMError * _Nullable) | A callback function that handles the completion of the retrieval operation. |
Returns
The callback function receives the following parameters:
| Parameter Name | Data Type | Description |
|---|---|---|
data | NSDictionary * | The enrollment status (attestation data) retrieved for the specified user as a dictionary. |
metadata | NSDictionary<NSString *, NSString *> * | Additional metadata returned by the operation, if available. |
error | ZSMError * | Error object describing any issues encountered during the retrieval process. |
Enrolling (Attestation): FIDO2Client.webauthnCreate()
To initiate the creation of a new credential object, use the webauthnCreateWithOptions:completion: method. This function uses a dictionary containing the PublicKeyCredentialCreationOptions to generate the credential object, which can be stored securely for future authentication.
The response follows the PublicKeyCredential format from the WebAuthn standard.
Refer to Mozilla's online documentation on PublicKeyCredentialCreationOptions or to the W3C standard Options for Credential Creation. For response format, see the W3C standard PublicKeyCredential interface.
Usage
// Create options dictionary following FIDO2 WebAuthn standard
NSDictionary *creationOptions = @{
    @"rp": @{
        @"id": @"example.com",
        @"name": @"Example Service"
    },
    @"user": @{
        @"id": @"user-unique-id-as-base64",
        @"name": @"username",
        @"displayName": @"User's Display Name"
    },
    @"challenge": @"base64-encoded-challenge",
    @"pubKeyCredParams": @[
        @{@"type": @"public-key", @"alg": @(-7)} // ES256
    ]
    // Additional optional parameters
};

[client webauthnCreateWithOptions:creationOptions completion:^(NSDictionary * _Nullable data, NSDictionary<NSString *, NSString *> * _Nullable metadata, ZSMError * _Nullable error) {
    if (data) {
        // Handle successful creation
        NSString *rawId = data[@"rawId"];
        if (rawId) {
            // Store credential ID for future authentications
        }
    } else if (error) {
        // Handle error
    }
}];
Parameters
| Parameter Name | Data Type | Description |
|---|---|---|
options | NSDictionary * | A dictionary representing PublicKeyCredentialCreationOptions. |
completion | void (^)(NSDictionary * _Nullable, NSDictionary<NSString *, NSString *> * _Nullable, ZSMError * _Nullable) | A callback function that handles the completion of the operation. |
Returns
The promise resolves with the following parameters:
| Parameter Name | Data Type | Description |
|---|---|---|
data | NSDictionary * | The attestation data generated during credential creation as a dictionary. |
metadata | NSDictionary<NSString *, NSString *> * | Additional metadata returned by the operation, if available. |
error | ZSMError * | Error object describing any issues encountered during the creation process. |
Verifying (Assertion): FIDO2Client.webauthnGet()
To retrieve a credential object, use the webauthnGetWithOptions:completion: method. This method utilizes a dictionary containing the PublicKeyCredentialRequestOptions to authenticate the user.
The response follows the AuthenticatorAssertionResponse format from the WebAuthn standard.
Refer to Mozilla's online documentation on PublicKeyCredentialRequestOptions or to the W3C standard Options for Assertion Generation. For response format, see the W3C standard AuthenticatorAssertionResponse interface.
Usage
// Create options dictionary following FIDO2 WebAuthn standard
NSDictionary *requestOptions = @{
    @"challenge": @"base64-encoded-challenge",
    @"rpId": @"example.com",
    @"allowCredentials": @[
        @{
            @"type": @"public-key",
            @"id": @"previously-stored-credential-id"
        }
    ],
    @"timeout": @60000
};

[client webauthnGetWithOptions:requestOptions completion:^(NSDictionary * _Nullable data, NSDictionary<NSString *, NSString *> * _Nullable metadata, ZSMError * _Nullable error) {
    if (data) {
        // Handle successful assertion
        NSString *authenticatorData = data[@"authenticatorData"];
        NSString *signature = data[@"signature"];
        if (authenticatorData && signature) {
            // Verify the signature and authenticator data
        }
    } else if (error) {
        // Handle error
    }
}];
Parameters
| Parameter Name | Data Type | Description |
|---|---|---|
options | NSDictionary * | A dictionary representing PublicKeyCredentialRequestOptions. |
completion | void (^)(NSDictionary * _Nullable, NSDictionary<NSString *, NSString *> * _Nullable, ZSMError * _Nullable) | A callback function that handles the completion of the operation. |
Returns
The promise resolves with the following parameters:
| Parameter Name | Data Type | Description |
|---|---|---|
data | NSDictionary * | The assertion data generated during credential verification as a dictionary. |
metadata | NSDictionary<NSString *, NSString *> * | Additional metadata returned by the operation, if available. |
error | ZSMError * | Error object describing any issues encountered during the assertion process. |
Unbinding: FIDO2Client.unbind()
There are two versions of this method: one for removing all FIDO2 credentials for the current user, and another for removing credentials for a specific user.
For Current User
To remove all FIDO2 credentials and state for the current user from the device, use the unbindWithCompletion: method.
Usage
[clientt unbind];
Parameters
None. |
Returns
None. |
For Specific User
To remove FIDO2 credentials and state for a specific user from the device, use the unbindForUser:withCompletion: method.
Usage
NSString *userId = @"user123"; // Unique identifier for the user
[client unbindForUser:userId];
Parameters
| Parameter Name | Data Type | Description |
|---|---|---|
user | NSString * | The user ID for which to remove credentials. |
Returns
None.
ZSM Error Codes
| Name | Value | Explanation |
|---|---|---|
| ZSMErrorCode.Error | 0 | An error occurred during the ZSM api operation. Please check the error details for more information. |
| ZSMErrorCode.NetworkFailure | 1 | The co-operating server could not be reached, perhaps because the device is not connected to the internet, a port is blocked, or the server is offline. Please retry the operation. |
| ZSMErrorCode.InvalidLogin | 2 | The authentication server returned an invalid login. Please try again. |
| ZSMErrorCode.UnauthorizedUser | 3 | The user is not enrolled or banned and cannot complete the secure operation. Please re-enroll or contact an administrator. |
| ZSMErrorCode.BadCryptograpicValue | 100 | An unsupported cryptographic parameter set was used and the secure operation was aborted. Please retry with a valid cryptographic parameter set. |
| ZSMErrorCode.CryptographicFailure | 101 | The cryptographic operation failed for an undisclosed reason, such as keys out of sync, communication error, or timed out. Please try again. |
| ZSMErrorCode.CryptographicKey | 102 | A message cannot be signed without generating the cryptographic key first. Please generate the cryptographic key and then try again. |
| ZSMErrorCode.SecureStorageUnavailable | 103 | The secure storage for key information is currently unavailable. Please try again later. |
| ZSMErrorCode.SecureStorageFailure | 104 | The secure storage operation failed due to an internal error. Please try again. |
| ZSMErrorCode.SecureStorageUnauthenticated | 105 | The secure storage operation failed because the user is not authenticated. Please authenticate the user and try again. |
| ZSMErrorCode.RegistrationFailure | 200 | The registration process failed due to an error. Please try again. |
| ZSMErrorCode.RegistrationIncomplete | 201 | The registration process is incomplete and requires additional information. Please provide the necessary information to complete the registration. |
| ZSMErrorCode.DeviceSuspended | 300 | The device is suspended and cannot perform the requested |
| operation. Please contact an administrator for further assistance. | ||
| ZSMErrorCode.DeviceDeactivated | 301 | The device is deactivated and cannot perform the requested |
| operation. Please contact an administrator for further assistance. | ||
| ZSMErrorCode.AccountDeactivated | 303 | The user account is deactivated and cannot perform the |
| requested operation. Please contact an administrator for further assistance. | ||
| ZSMErrorCode.AuthenticationFailure | 400 | The authentication process failed due to an error. Please try again. |
| ZSMErrorCode.AuthenticationIncomplete | 401 | The authentication process is incomplete and requires additional information. Please provide the necessary information to complete the authentication. |
| ZSMErrorCode.DeviceNotFound | 500 | The device could not be found. Please ensure the device is registered and try again. |
| ZSMErrorCode.DeviceNotLinked | 501 | The device is not linked to the user account. Please link the device to the user account and try again. |
| ZSMErrorCode.DeviceAlreadyLinked | 502 | The device is already linked to another user account. Please unlink the device and try again. |
| ZSMErrorCode.DeviceLinkingFailure | 503 | The device linking process failed due to an error. Please try again. |
| ZSMErrorCode.DeviceUnlinkingFailure | 504 | The device unlinking process failed due to an error. Please try again. |
| ZSMErrorCode.InvalidRequest | 600 | The request is invalid or malformed. Please check the request parameters and try again. |
| ZSMErrorCode.InternalServerError | 700 | An internal server error occurred. Please try again later. |
| ZSMErrorCode.UnknownError | 800 | An unknown error occurred. Please contact support for assistance. |
Glossary
API Consumers
API consumers are third-parties that are authorized by either a vendor or customer organization to have access to selected ZSM APIs for purposes of performing trusted third-party functions and operations. ZSM provides optional integrations for selected trusted third parties such.
Consumer
Consumers are the end-users of an application which contains the ZSM Client SDK. They are the customers of a ZSM customer organization.
CredentialID
WebAuthn identifier for a credential, synonymous with the identifier used for an enrollment. CredentialID is returned during the WebAuthn create() call and is used by the Relying Party server to store and find the Public Key needed to verify signed challenges during WebAuthn get() calls.
Customer Client Application
A customer organization’s client application (iOS, Android, or Web) that has incorporated the ZSM Cryptographic Module using the ZSM Client SDK
Customer Host Server (aka Relying Party Server)
A customer organization’s server that validates challenges signed by ZSM for consumer enrollments and verifications.
Customer Organization
ZSM customer that integrates the ZSM Client SDK into their application(s) and uses the ZSM Management APIs and Web Administration Console to manage their use of the service.
Enrollment
Enrollment is a term used to describe the unique combination of installation, consumer, application, and application environment. There is one enrollment for each unique combination of these four entities. Keysets are associated with an enrollment.
Instance ID (deprecated)
A unique identifier that identifies a specific instance of an application on a specific installation of the ZSM client on a device. This identifier is unique per application such that two applications installed on the same installation on a device have different instance identifiers. And, a specific application installed on different devices will each have their own unique instance identifiers.
Organization
Three types of organizations are defined in ZSM: API consumers, customers, and vendors.
Server Client APIs
REST APIs used to facilitate transactions between the ZSM Server and Client for consumer registration, key set generation, signing, and signature verification.
Server Management APIs
REST APIs used to manage the ZSM system, including organization management, application management, installation management, and consumer management.
User
Individual associated with a Customer who has registered an account with the ZSM service.
Vendor
This vendor organization is the organization that provides the ZSM system to customers.